Inclusivity Essentials_ Creating Accessible Websites for Nonprofits .pdf
Aspnet auth advanced_cs
1. Forms Authentication, Authorization, User
Accounts, and Roles :: Forms
Authentication Configuration and
Advanced Topics
Introduction
In the previous tutorial we looked at the steps necessary for implementing forms
authentication in an ASP.NET application, from specifying configuration settings in
Web.config to creating a log in page to displaying different content for authenticated
and anonymous users. Recall that we configured the website to use forms
authentication by setting the mode attribute of the <authentication> element to
Forms. The <authentication> element may optionally include a <forms> child
element, through which an assortment of forms authentication settings may be
specified.
In this tutorial we will examine the various forms authentication settings and see
how to modify them through the <forms> element. This will entail a detailed look at
customizing the forms authentication ticket’s timeout value, using a login page with
a custom URL (like SignIn.aspx instead of Login.aspx), and cookieless forms
authentication tickets. We will also examine the makeup of the forms authentication
ticket more closely and see the precautions ASP.NET takes to ensure that the ticket’s
data is secure from inspection and tampering. Finally, we will look at how to store
extra user data in the forms authentication ticket and how to model this data
through a custom principal object.
Step 1: Examining the <forms>
Configuration Settings
The forms authentication system in ASP.NET offers a number of configuration
settings that can be customized on an application-by-application basis. This includes
settings like: the lifetime of the forms authentication ticket; what sort of protection is
applied to the ticket; under what conditions cookieless authentication tickets are
used; the path to the login page; and other information. To modify the default
values, add a <forms> element as a child of the <authentication> element,
specifying those property values you want to customize as XML attributes like so:
<authentication mode="Forms">
<forms
propertyName1="value1"
propertyName2="value2"
...
2. propertyNameN="valueN"
/>
</authentication>
Table 1 summarizes the properties that can be customized through the <forms>
element. Since Web.config is an XML file, the attribute names in the left column are
case-sensitive.
Attribute Description
Cookieless This attribute specifies under what conditions the
authentication ticket is stored in a cookie versus being
embedded in the URL. Allowable values are:
UseCookies; UseUri; AutoDetect; and
UseDeviceProfile (the default). Step 2 examines this
setting in more detail.
defaultUrl Indicates the URL that users are redirected to after
signing in from the login page if there is no
RedirectUrl value specified in the querystring. The
default value is default.aspx.
Domain When using cookie-based authentication tickets, this
setting specifies the cookie’s domain value. The default
value is an empty string, which causes the browser to
use the domain from which it was issued (such as
www.yourdomain.com). In this case, the cookie will
not be sent when making requests to subdomains,
such as admin.yourdomain.com. If you want the cookie
to be passed to all subdomains you need to customize
the domain attribute setting it to “yourdomain.com”.
enableCrossAppRedirects A Boolean value indicating whether authenticated users
are remembered when redirected to URLs in other web
applications on the same server. The default is false.
loginUrl The URL of the login page. The default value is
login.aspx.
Name When using cookie-based authentication tickets, the
name of the cookie. The default is “.ASPXAUTH”.
Path When using cookie-based authentication tickets, this
setting specifies the cookie’s path attribute. The path
attribute enables a developer to limit the scope of a
cookie to a particular directory hierarchy. The default
value is “/”, which informs the browser to send the
authentication ticket cookie to any request made to the
domain.
protection Indicates what techniques are used to protect the
forms authentication ticket. The allowable values are:
3. All (the default); Encryption; None; and Validation.
These settings are discussed in detail in Step 3.
requireSSL A Boolean value that indicates whether an SSL
connection is required to transmit the authentication
cookie. The default value is false.
slidingExpiration A Boolean value that indicates whether the
authentication cookie’s timeout is reset each time the
user visits the site during a single session. The default
value is false. The authentication ticket timeout policy
is discussed in more detail in the “Specifying the
Ticket’s Timeout Value” section.
Timeout Specifies the time, in minutes, after which the
authentication ticket cookie expires. The default value
is 30. The authentication ticket timeout policy is
discussed in more detail in the “Specifying the Ticket’s
Timeout Value” section.
Table 1: A Summary of the <forms> Element’s Attributes
In ASP.NET 2.0 and beyond, the default forms authentication values are hard-coded
in the FormsAuthenticationConfiguration class in the .NET Framework. Any
modifications must be applied on an application-by-application basis in the
Web.config file. This differs from ASP.NET 1.x, where the default forms
authentication values were stored in the machine.config file (and could therefore be
modified via editing machine.config). While on the topic of ASP.NET 1.x, it is
worthwhile to mention that a number of the forms authentication system settings
have different default values in ASP.NET 2.0 and beyond than in ASP.NET 1.x. If you
are migrating your application from an ASP.NET 1.x environment, it is important to
be aware of these differences. Consult the <forms> element technical documentation
for a list of the differences.
Note: Several forms authentication settings, such as the timeout, domain,
and path, specify details for the resulting forms authentication ticket cookie.
For more information on cookies, how they work, and their various properties,
read this Cookies tutorial.
Specifying the Ticket’s Timeout Value
The forms authentication ticket is a token that represents an identity. With cookie-
based authentication tickets, this token is held in the form of a cookie and sent to
the web server on each request. Possession of the token, in essence, declares, “I am
username, I have already logged in,” and is used so that a user’s identity can be
remembered across page visits.
The forms authentication ticket not only includes the user’s identity, but also
contains information to help ensure the integrity and security of the token. After all,
4. we don’t want a nefarious user to be able to create a counterfeit token, or to modify
a legit token in some underhanded way.
One such bit of information included in the ticket is an expiry, which is the date and
time the ticket is no longer valid. Each time the FormsAuthenticationModule
inspects an authentication ticket, it ensures that the ticket’s expiry has not yet
passed. If it has, it disregards the ticket and identifies the user as being anonymous.
This safeguard helps protect against replay attacks. Without an expiry, if a hacker
was able to get her hands on a user’s valid authentication ticket – perhaps by
gaining physical access to their computer and rooting through their cookies – they
could send a request to the server with this stolen authentication ticket and gain
entry. While the expiry doesn’t prevent this scenario, it does limit the window during
which such an attack can succeed.
Note: Step 3 details additional techniques used by the forms authentication
system to protect the authentication ticket.
When creating the authentication ticket, the forms authentication system determines
its expiry by consulting the timeout setting. As noted in Table 1, the timeout setting
defaults to 30 minutes, meaning that when the forms authentication ticket is created
its expiry is set to a date and time 30 minutes in the future.
The expiry defines an absolute time in the future when the forms authentication
ticket expires. But usually developers want to implement a sliding expiry, one that is
reset every time the user revisits the site. This behavior is determined by the
slidingExpiration settings. If set to true, each time the
FormsAuthenticationModule authenticates a user, it updates the ticket’s expiry. If
set to false (the default), the expiry is not updated on each request, thereby
causing the ticket to expire exactly timeout number of minutes past when the ticket
was first created.
Note: The expiry stored in the authentication ticket is an absolute date and
time value, like “August 2, 2008 11:34 AM.” Moreover, the date and time are
relative to the web server’s local time. This design decision can have some
interesting side effects around Daylight Saving Time (DST), which is when
clocks in the United States are moved ahead one hour (assuming the web
server is hosted in a locale where Daylight Saving Time is observed). Consider
what would happen for an ASP.NET website with a 30 minute expiry near the
time that DST begins (which is at 2:00 AM). Imagine a visitor signs on to the
site on March 11, 2008 at 1:55 AM. This would generate a forms
authentication ticket that expires at March 11, 2008 at 2:25 AM (30 minutes
in the future). However, once 2:00 AM rolls around, the clock jumps to 3:00
AM because of DST. When the user loads a new page six minutes after
signing in (at 3:01 AM), the FormsAuthenticationModule notes that the
ticket has expired and redirects the user to the login page. For a more
thorough discussion on this and other authentication ticket timeout oddities,
as well as workarounds, pick up a copy of Stefan Schackow’s Professional
5. ASP.NET 2.0 Security, Membership, and Role Management (ISBN: 978-0-
7645-9698-8).
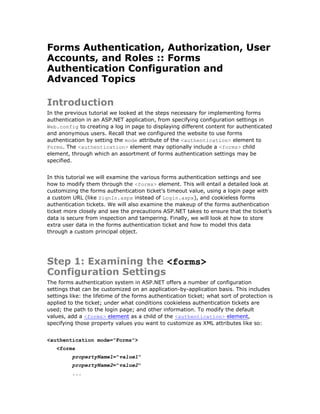
Figure 1 illustrates the workflow when slidingExpiration is set to false and
timeout is set to 30. Note that the authentication ticket generated at login contains
the expiration date, and this value is not updated on subsequent requests. If the
FormsAuthenticationModule finds that the ticket has expired, it discards it and
treats the request as anonymous.
Figure 1: A Graphical Representation of the Forms Authentication Ticket’s
Expiry When slidingExpiration is false
Figure 2 shows the workflow when slidingExpiration is set to true and timeout is
set to 30. When an authenticated request is received (with a non-expired ticket) its
expiry is updated to timeout number of minutes in the future.
6. Figure 2: A Graphical Representation of the Forms Authentication Ticket’s
When slidingExpiration is true
When using cookie-based authentication tickets (the default), this discussion
becomes a little more confusing because cookies can also have their own expiries
specified. A cookie’s expiry (or lack thereof) instructs the browser when the cookie
should be destroyed. If the cookie lacks an expiry, it is destroyed when the browser
shuts down. If an expiry is present, however, the cookie remains stored on the user’s
computer until the date and time specified in the expiry has passed. When a cookie
is destroyed by the browser, it is no longer sent to the web server. Therefore, the
destruction of a cookie is analogous to the user logging out of the site.
Note: Of course, a user may proactively remove any cookies stored on their
computer. In Internet Explorer 7, you would go to Tools, Options, and click
the Delete button in the “Browsing history” section. From there, click the
“Delete cookies” button.
The forms authentication system creates session-based or expiry-based cookies
depending on the value passed in to the persistCookie parameter. Recall that the
FormsAuthentication class’s GetAuthCookie, SetAuthCookie, and
RedirectFromLoginPage methods take in two input parameters: username and
persistCookie. The login page we created in the preceding tutorial included a
7. “Remember me” CheckBox, which determined whether a persistent cookie was
created. Persistent cookies are expiry-based; non-persistent cookies are session-
based.
The timeout and slidingExpiration concepts already discussed apply the same to
both session- and expiry-based cookies. There is only one minor difference in
execution: when using expiry-based cookies with slidingTimeout set to true, the
cookie’s expiry is only updated when more than half of the specified time has
elapsed.
Let’s update our website’s authentication ticket timeout policies so that tickets
timeout after one hour (60 minutes), using a sliding expiration. To effect this
change, update the Web.config file, adding a <forms> element to the
<authentication> element with the following markup:
<authentication mode="Forms">
<forms
slidingExpiration="true"
timeout="60"
/>
</authentication>
Using an Login Page URL Other than
Login.aspx
Since the FormsAuthenticationModule automatically redirects unauthorized users to
the login page, it needs to know the login page’s URL. This URL is specified by the
loginUrl attribute in the <forms> element and defaults to “login.aspx”. If you are
porting over an existing website, you may already have a login page with a different
URL, one that has already been bookmarked and indexed by search engines. Rather
than renaming your existing login page to “login.aspx” and breaking links and users’
bookmarks, you can instead modify the loginUrl attribute to point to your login
page.
For example, if your login page was named SignIn.aspx and was located in the
Users directory, you could point the loginUrl configuration setting to
“~/Users/SignIn.aspx” like so:
<authentication mode="Forms">
<forms
loginUrl="~/Users/SignIn.aspx"
/>
</authentication>
8. Since our current application already has a login page named Login.aspx, there’s no
need to specify a custom value in the <forms> element.
Step 2: Using Cookieless Forms
Authentication Tickets
By default the forms authentication system determines whether to store its
authentication tickets in the cookies collection or embed them in the URL based on
the user agent visiting the site. All mainstream desktop browsers like Internet
Explorer, Firefox, Opera, and Safari, support cookies, but not all mobile devices do.
The cookie policy used by the forms authentication system depends on the
cookieless setting in the <forms> element, which can be assigned one of four
values:
UseCookies – specifies that cookie-based authentication tickets will always be
used.
UseUri – indicates that cookie-based authentication tickets will never be
used.
AutoDetect – if the device profile does not support cookies, cookie-based
authentication tickets are not used; if the device profile supports cookies, a
probing mechanism is used to determine if cookies are enabled.
UseDeviceProfile – the default; uses cookie-based authentication tickets
only if the device profile supports cookies. No probing mechanism is used.
The AutoDetect and UseDeviceProfile settings rely on a device profile in
ascertaining whether to use cookie-based or cookieless authentication tickets.
ASP.NET maintains a database of various devices and their capabilities, such as
whether they support cookies, what version of JavaScript they support, and so on.
Each time a device requests a web page from a web server it sends along a user-
agent HTTP header that identifies the device type. ASP.NET automatically matches
the supplied user-agent string with the corresponding profile specified in its
database.
Note: This database of device capabilities is stored in a number of XML files
that adhere to the Browser Definition File schema. The default device profile
files are located in
%WINDIR%Microsoft.NetFrameworkv2.0.50727CONFIGBrowsers. You
can also add custom files to your application’s App_Browsers folder. For more
information, see How To: Detect Browser Types in ASP.NET Web Pages.
Because the default setting is UseDeviceProfile, cookieless forms authentication
tickets will be used when the site is visited by a device whose profile reports that it
does not support cookies.
9. Encoding the Authentication Ticket in the
URL
Cookies are a natural medium for including information from the browser in each
request to a particular website, which is why the default forms authentication
settings use cookies if the visiting device supports them. If cookies are not
supported, an alternate means for passing the authentication ticket from the client to
the server must be employed. A common workaround used in cookieless
environments is to encode the cookie data in the URL.
The best way to see how such information can be embedded within the URL is to
force the site to use cookieless authentication tickets. This can be accomplished by
setting the cookieless configuration setting to UseUri:
<authentication mode="Forms">
<forms
cookieless="UseUri"
slidingExpiration="true"
timeout="60"
/>
</authentication>
Once you have made this change, visit the site through a browser. When visiting as
an anonymous user, the URLs will look exactly like they did before. For example,
when visiting Default.aspx page my browser’s address bar shows the following
URL:
http://localhost:2448/ASPNET_Security_Tutorial_03_CS/default.aspx
However, upon logging in, the forms authentication ticket is embedded into the URL.
For example, after visiting the login page and logging in as Sam, I am returned to
the Default.aspx page, but the URL this time is:
http://localhost:2448/ASPNET_Security_Tutorial_03_CS/(F(jaIOIDTJxIr12xY
S-VVgkqKCVAuIoW30Bu0diWi6flQC-FyMaLXJfow_Vd9GZkB2Cv-
rfezq0gKadKX0YPZCkA2))/default.aspx
The forms authentication ticket has been embedded within the URL. The string
(F(jaIOIDTJxIr12xYS-VVgkqKCVAuIoW30Bu0diWi6flQC-FyMaLXJfow_Vd9GZkB2Cv-
rfezq0gKadKX0YPZCkA2) represents the hex-encoded authentication ticket
information, and is the same data that is usually stored within a cookie.
10. In order for cookieless authentication tickets to work, the system must encode all
URLs on the page to include the authentication ticket data, otherwise the
authentication ticket will be lost when the user clicks on a link. Thankfully, this
embedding logic is performed automatically. To demonstrate this functionality, open
the Default.aspx page and add a HyperLink control, setting its Text and
NavigateUrl properties to “Test Link” and “SomePage.aspx”, respectively. It doesn’t
matter that there really isn’t a page in our project named SomePage.aspx.
Save the changes to Default.aspx and then visit it through a browser. Log on to the
site so that the forms authentication ticket is embedded in the URL. Next, from
Default.aspx, click the “Test Link” link. What happened? If no page named
SomePage.aspx exists, then a 404 error occurred, but that’s not what’s important
here. Instead, focus on the Address bar in your browser. Note that it includes the
forms authentication ticket in the URL!
http://localhost:2448/ASPNET_Security_Tutorial_03_CS/(F(jaIOIDTJxIr12xY
S-VVgkqKCVAuIoW30Bu0diWi6flQC-FyMaLXJfow_Vd9GZkB2Cv-
rfezq0gKadKX0YPZCkA2))/SomePage.aspx
The URL “SomePage.aspx” in the link was automatically converted into a URL that
included the authentication ticket - we didn’t have to write a lick of code! The form
authentication ticket will automatically be embedded in the URL for any hyperlinks
that do not start with “http://” or “/”. It doesn’t matter if the hyperlink appears in a
call to Response.Redirect, in a HyperLink control, or in an anchor HTML element
(i.e., <a href="...">...</a>). As long as the URL isn’t something like
“http://www.someserver.com/SomePage.aspx” or “/SomePage.aspx”, the forms
authentication ticket will be embedded for us.
Note: Cookieless forms authentication tickets adhere to the same timeout
policies as cookie-based authentication tickets. However, cookieless
authentication tickets are more prone to replay attacks since the
authentication ticket is embedded directly in the URL. Imagine a user who
visits a website, logs in, and then pastes the URL in an email to a colleague. If
the colleague clicks on that link before the expiry is reached, they will be
logged in as the user who sent the email!
Step 3: Securing the Authentication Ticket
The forms authentication ticket is transmitted over the wire either in a cookie or
embedded directly within the URL. In addition to identity information, the
authentication ticket can also include user data (as we will see in Step 4).
Consequently, it is important that the ticket’s data is encrypted from prying eyes and
(even more importantly) that the forms authentication system can guarantee that
the ticket was not tampered with.
11. To ensure the privacy of the ticket’s data, the forms authentication system can
encrypt the ticket data. Failure to encrypt the ticket data sends potentially sensitive
information over the wire in plain-text.
To guarantee a ticket’s authenticity, the forms authentication system must validate
the ticket. Validation is the act of ensuring that a particular piece of data has not
been modified, and is accomplished via a message authentication code (MAC). In a
nutshell, the MAC is a small piece of information that identifies the data that needs
to be validated (in this case, the ticket). If the data represented by the MAC is
modified, then the MAC and the data will not match up. Moreover, it is
computationally hard for a hacker to both modify the data and generate his own MAC
to correspond with the modified data.
When creating (or modifying) a ticket, the forms authentication system creates a
MAC and attaches it to the ticket’s data. When a subsequent request arrives, the
forms authentication system compares the MAC and ticket data to validate the
authenticity of the ticket data. Figure 3 illustrates this workflow graphically.
12. Figure 3: The Ticket’s Authenticity is Ensured through a MAC
What security measures are applied to the authentication ticket depends on the
protection setting in the <forms> element. The protection setting may be
assigned to one of the following three values:
All – the ticket is both encrypted and digitally signed (the default).
Encryption – only encryption is applied – no MAC is generated.
None – the ticket is neither encrypted nor digitally signed.
Validation – a MAC is generated, but the ticket data is sent over the wire in
plain-text.
Microsoft strongly recommends using the All setting.
13. Setting the Validation and Decryption
Keys
The encryption and hashing algorithms used by the forms authentication system to
encrypt and validate the authentication ticket are customizable through the
<machineKey> element in Web.config. Table 2 outlines the <machineKey> element’s
attributes and their possible values.
Attribute Description
decryption Indicates the algorithm used for encryption. This attribute can
have one of the following four values:
Auto – the default; determines the algorithm based on
the length of the decryptionKey attribute.
AES – uses the Advanced Encryption Standard (AES)
algorithm.
DES – uses the Data Encryption Standard (DES). This
algorithm is considered computationally weak and
should not be used.
3DES – uses the Triple DES algorithm, which works by
applying the DES algorithm three times.
decryptionKey The secret key used by the encryption algorithm. This value
must either be a hexadecimal string of the appropriate length
(based on the value in decryption), “AutoGenerate”, or either
value appended with “,IsolateApps”. Adding “IsolateApps”
instructs ASP.NET to use a unique value for each application.
The default is “AutoGenerate,IsolateApps”.
validation Indicates the algorithm used for validation. This attribute can
have one of the following four values:
AES - uses the Advanced Encryption Standard (AES)
algorithm.
MD5 – uses the Message-Digest 5 (MD5) algorithm.
SHA1 – uses the SHA1 algorithm (the default).
3DES – uses the Triple DES algorithm.
validationKey The secret key used by the validation algorithm. This value
must either be a hexadecimal string of the appropriate length
(based on the value in validation), “AutoGenerate”, or either
value appended with “,IsolateApps”. Adding “IsolateApps”
instructs ASP.NET to use a unique value for each application.
The default is “AutoGenerate,IsolateApps”.
Table 2: The <machineKey> Element Attributes
14. A thorough discussion of these encryption and validation options, and the pros and
cons of the various algorithms, is beyond the scope of this tutorial. For an in-depth
look at these issues, including guidance on what encryption and validation algorithms
to use, what key lengths to use, and how best to generate these keys, refer to
Professional ASP.NET 2.0 Security, Membership, and Role Management.
By default, the keys used for encryption and validation are generated automatically
for each application, and these keys are stored in the Local Security Authority (LSA).
In short, the default settings guarantee unique keys on a web server-by-web server
and application-by-application basis. Consequently, this default behavior will not
work for the two following scenarios:
Web Farms – in a web farm scenario, a single web application is hosted on
multiple web servers for purposes of scalability and redundancy. Each
incoming request is dispatched to a server in the farm, meaning that over the
lifetime of a user’s session, different servers may be used to handle his
various requests. Consequently, each server must use the same encryption
and validation keys so that the forms authentication ticket created,
encrypted, and validated on one server can be decrypted and validated on a
different server in the farm.
Cross Application Ticket Sharing – a single web server may host multiple
ASP.NET applications. If you need for these different applications to share a
single forms authentication ticket, it is imperative that their encryption and
validation keys match up.
When working in a web farm setting or sharing authentication tickets across
applications on the same server, you will need to configure the <machineKey>
element in the affected applications so that their decryptionKey and validationKey
values match up.
While neither of the above scenarios applies to our sample application, we can still
specify explicit decryptionKey and validationKey values and define the algorithms
to be used. Add a <machineKey> setting to the Web.config file:
<configuration>
<system.web>
... Some markup was removed for brevity ...
<machineKey
decryption="AES"
validation="SHA1"
decryptionKey="1513F567EE75F7FB5AC0AC4D79E1D9F25430E3E2F1BCDD3370BCFC4E
FC97A541"
15. validationKey="32CBA563F26041EE5B5FE9581076C40618DCC1218F5F447634EDE862
4508A129"
/>
</system.web>
</configuration>
For more information check out How To: Configure MachineKey in ASP.NET 2.0.
Note: The decryptionKey and validationKey values were taken from Steve
Gibson’s Perfect Passwords web page, which generates 64 random
hexadecimal characters on each page visit. To lessen the likelihood of these
keys making their way into your production applications, you are encouraged
to replace the above keys with randomly generated ones from the Perfect
Passwords page.
Step 4: Storing Additional User Data in the
Ticket
Many web applications display information about or base the page’s display on the
currently logged on user. For example, a web page might show the user’s name and
the date she last logged on in the upper corner of every page. The forms
authentication ticket stores the currently logged on user’s username, but when any
other information is needed, the page must go to the user store – typically a
database – to lookup the information not stored in the authentication ticket.
With a little bit of code we can store additional user information in the forms
authentication ticket. Such data can be expressed through the
FormsAuthenticationTicket class’s UserData property. This is a useful place to put
small amounts of information about the user that is commonly needed. The value
specified in the UserData property is included as part of the authentication ticket
cookie and, like the other ticket fields, is encrypted and validated based on the forms
authentication system’s configuration. By default, UserData is an empty string.
In order to store user data in the authentication ticket, we need to write a bit of code
in the login page that grabs the user-specific information and stores it in the ticket.
Since UserData is a property of type string, the data stored in it must be properly
serialized as a string. For example, imagine that our user store included each user’s
date of birth and the name of their employer, and we wanted to store these two
property values in the authentication ticket. We could serialize these values into a
string by concatenating the user’s date of birth’s string with a pipe (“|”), followed by
the employer name. For a user born on August 15, 1974 that works for Northwind
Traders, we would assign the UserData property the string: “1974-08-15|Northwind
Traders”.
16. Whenever we need to access the data stored in the ticket, we can do so by grabbing
the current request’s FormsAuthenticationTicket and deserializing the UserData
property. In the case of the date of birth and employer name example, we would
split the UserData string into two substrings based on the delimiter (“|”).
Figure 4: Additional User Information Can Be Stored in the Authentication
Ticket
Writing Information to UserData
Unfortunately, adding user-specific information to a forms authentication ticket is not
as straightforward as one might expect. The UserData property of the
FormsAuthenticationTicket class is read-only and can only be specified through
the FormsAuthenticationTicket class constructor. When specifying the UserData
property in the constructor, we also need to provide the ticket’s other values: the
username, the issue date, the expiration, and so on. When we created the login page
in the preceding tutorial, this was all handled for us by the FormsAuthentication
class. When adding UserData to the FormsAuthenticationTicket, we will need to
write code to replicate much of the functionality already provided by the
FormsAuthentication class.
17. Let’s explore the necessary code for working with UserData by updating the
Login.aspx page to record additional information about the user to the
authentication ticket. Pretend that our user store contains information about the
company the user works for and their title, and that we want to capture this
information in the authentication ticket. Update the Login.aspx page’s LoginButton
Click event handler so that the code looks like the following:
protected void LoginButton_Click(object sender, EventArgs e)
{
// Three valid username/password pairs: Scott/password,
Jisun/password, and Sam/password.
string[] users = { "Scott", "Jisun", "Sam" };
string[] passwords = { "password", "password", "password" };
string[] companyName = { "Northwind Traders", "Adventure Works",
"Contoso" };
string[] titleAtCompany = { "Janitor", "Scientist", "Mascot" };
for (int i = 0; i < users.Length; i++)
{
bool validUsername = (string.Compare(UserName.Text, users[i],
true) == 0);
bool validPassword = (string.Compare(Password.Text,
passwords[i], false) == 0);
if (validUsername && validPassword)
{
// Query the user store to get this user's User Data
string userDataString = string.Concat(companyName[i], "|",
titleAtCompany[i]);
// Create the cookie that contains the forms authentication
ticket
HttpCookie authCookie =
FormsAuthentication.GetAuthCookie(UserName.Text, RememberMe.Checked);
// Get the FormsAuthenticationTicket out of the encrypted
cookie
FormsAuthenticationTicket ticket =
FormsAuthentication.Decrypt(authCookie.Value);
// Create a new FormsAuthenticationTicket that includes our
custom User Data
18. FormsAuthenticationTicket newTicket = new
FormsAuthenticationTicket(ticket.Version, ticket.Name,
ticket.IssueDate, ticket.Expiration, ticket.IsPersistent,
userDataString);
// Update the authCookie's Value to use the encrypted
version of newTicket
authCookie.Value = FormsAuthentication.Encrypt(newTicket);
// Manually add the authCookie to the Cookies collection
Response.Cookies.Add(authCookie);
// Determine redirect URL and send user there
string redirUrl =
FormsAuthentication.GetRedirectUrl(UserName.Text, RememberMe.Checked);
Response.Redirect(redirUrl);
}
}
// If we reach here, the user's credentials were invalid
InvalidCredentialsMessage.Visible = true;
}
Let’s step through this code one line at a time. The method starts by defining four
string arrays: users, passwords, companyName, and titleAtCompany. These arrays
hold the usernames, passwords, company names, and titles for the user accounts in
the system, of which there are three: Scott, Jisun, and Sam. In a real application,
these values would be queried from the user store, not hard-coded in the page’s
source code.
In the previous tutorial, if the supplied credentials were valid we simply called
FormsAuthentication.RedirectFromLoginPage(UserName.Text,
RememberMe.Checked), which performed the following steps:
1. Created the forms authentication ticket
2. Wrote the ticket to the appropriate store. For cookies-based authentication
tickets, the browser’s cookies collection is used; for cookieless authentication
tickets, the ticket data is serialized into the URL
3. Redirected the user to the appropriate page
These steps are replicated in the code above. First, the string we will eventually store
in the UserData property is formed by combining the company name and the title,
delimiting the two values with a pipe character (“|”).
19. string userDataString = string.Concat(companyName[i], "|",
titleAtCompany[i]);
Next, the FormsAuthentication.GetAuthCookie method is invoked, which creates
the authentication ticket, encrypts and validates it according to the configuration
settings, and places it in an HttpCookie object.
HttpCookie authCookie =
FormsAuthentication.GetAuthCookie(UserName.Text, RememberMe.Checked);
In order to work with the FormAuthenticationTicket embedded within the cookie,
we need to call the FormAuthentication class’s Decrypt method, passing in the
cookie value.
FormsAuthenticationTicket ticket =
FormsAuthentication.Decrypt(authCookie.Value);
We then create a new FormsAuthenticationTicket instance based on the existing
FormsAuthenticationTicket’s values. However, this new ticket includes the user-
specific information (userDataString).
FormsAuthenticationTicket newTicket = new
FormsAuthenticationTicket(ticket.Version, ticket.Name,
ticket.IssueDate, ticket.Expiration, ticket.IsPersistent,
userDataString);
We then encrypt (and validate) the new FormsAuthenticationTicket instance by
calling the Encrypt method, and put this encrypted (and validated) data back into
authCookie.
authCookie.Value = FormsAuthentication.Encrypt(newTicket);
Finally, authCookie is added to the Response.Cookies collection and the
GetRedirectUrl method is called to determine the appropriate page to send the
user.
Response.Cookies.Add(authCookie);
string redirUrl = FormsAuthentication.GetRedirectUrl(UserName.Text,
RememberMe.Checked);
20. Response.Redirect(redirUrl);
All of this code is needed because the UserData property is read-only and the
FormsAuthentication class does not provide any methods for specifying UserData
information in its GetAuthCookie, SetAuthCookie, or RedirectFromLoginPage
methods.
Note: The code we just examined stores user-specific information in a
cookies-based authentication ticket. The classes responsible for serializing the
forms authentication ticket to the URL are internal to the .NET Framework.
Long story short, you cannot store user data in a cookieless forms
authentication ticket.
Accessing the UserData Information
At this point each user’s company name and title is stored in the forms
authentication ticket’s UserData property when they log in. This information can be
accessed from the authentication ticket on any page without requiring a trip to the
user store. To illustrate how this information can be retrieved from the UserData
property, let’s update Default.aspx so that its welcome message includes not only
the user’s name, but also the company they work for and their title.
Currently, Default.aspx contains an AuthenticatedMessagePanel Panel with a
Label control named WelcomeBackMessage. This Panel is only displayed to
authenticated users. Update the code in Default.aspx’s Page_Load event handler so
that it looks like the following:
protected void Page_Load(object sender, EventArgs e)
{
if (Request.IsAuthenticated)
{
WelcomeBackMessage.Text = "Welcome back, " + User.Identity.Name
+ "!";
// Get User Data from FormsAuthenticationTicket and show it in
WelcomeBackMessage
FormsIdentity ident = User.Identity as FormsIdentity;
if (ident != null)
{
FormsAuthenticationTicket ticket = ident.Ticket;
string userDataString = ticket.UserData;
// Split on the |
21. string[] userDataPieces =
userDataString.Split("|".ToCharArray());
string companyName = userDataPieces[0];
string titleAtCompany = userDataPieces[1];
WelcomeBackMessage.Text += string.Format(" You are the {0}
of {1}.", titleAtCompany, companyName);
}
AuthenticatedMessagePanel.Visible = true;
AnonymousMessagePanel.Visible = false;
}
else
{
AuthenticatedMessagePanel.Visible = false;
AnonymousMessagePanel.Visible = true;
}
}
If Request.IsAuthenticated is true, then the WelcomeBackMessage’s Text property
is first set to “Welcome back, username.” Then, the User.Identity property is cast
to a FormsIdentity object so that we can access the underlying
FormsAuthenticationTicket. Once we have the FormsAuthenticationTicket, we
deserialize the UserData property into the company name and title. This is
accomplished by splitting the string on the pipe character. The company name and
title are then displayed in the WelcomeBackMessage Label.
Figure 5 shows a screenshot of this display in action. Logging in as Scott displays a
welcome back message that includes Scott’s company and title.
22. Figure 5: The Currently Logged On User’s Company and Title are Displayed
Note: The authentication ticket’s UserData property serves as a cache for the
user store. Like any cache, it needs to be updated when the underlying data
is modified. For example, if there is a web page from which users can update
their profile, the fields cached in the UserData property must be refreshed to
reflect the changes made by the user.
Step 5: Using a Custom Principal
On each incoming request the FormsAuthenticationModule attempts to
authenticate the user. If a non-expired authentication ticket is present, the
FormsAuthenticationModule assigns the HttpContext.User property to a new
GenericPrincipal object. This GenericPrincipal object has an Identity of type
FormsIdentity, which includes a reference to the forms authentication ticket. The
GenericPrincipal class contains the bare minimum functionality needed by a class
that implements IPrincipal – it just has an Identity property and an IsInRole
method.
The principal object has two responsibilities: to indicate what roles the user belongs
to and to provide identity information. This is accomplished through the IPrincipal
interface’s IsInRole(roleName) method and Identity property, respectively. The
GenericPrincipal class allows for a string array of role names to be specified via its
constructor; its IsInRole(roleName) method merely checks to see if the passed in
roleName exists within the string array. When the FormsAuthenticationModule
creates the GenericPrincipal, it passes in an empty string array to the
GenericPrincipal’s constructor. Consequently, any call to IsInRole will always
return false.
23. The GenericPrincipal class meets the needs for most forms based authentication
scenarios where roles are not used. For those situations where the default role
handling is insufficient or when you need to associate a custom IIdentity object
with the user, you can create a custom IPrincipal object during the authentication
workflow and assign it to the HttpContext.User property.
Note: As we will see in future tutorials, when ASP.NET’s Roles framework is
enabled it creates a custom principal object of type RolePrincipal and
overwrites the forms authentication-created GenericPrincipal object. It
does this in order to customize the principal’s IsInRole method to interface
with the Roles framework’s API.
Since we have not concerned ourselves with roles yet, the only reason we would
have for creating a custom principal at this juncture would be to associate a custom
IIdentity object to the principal. In Step 4 we looked at storing additional user
information in the authentication ticket’s UserData property, in particular the user’s
company name and their title. However, the UserData information is only accessible
through the authentication ticket and only then as a serialized string, meaning that
anytime we want to view the user information stored in the ticket we need to parse
the UserData property.
We can improve the developer experience by creating a class that implements
IIdentity and includes CompanyName and Title properties. That way, a developer
can access the currently logged on user’s company name and title directly through
the CompanyName and Title properties without needed to know how to parse the
UserData property.
Creating the Custom Identity and
Principal Classes
For this tutorial, let’s create the custom principal and identity objects in the
App_Code folder. Start by adding an App_Code folder to your project – right-click on
the project name in Solution Explorer, select the Add ASP.NET Folder option, and
choose App_Code. The App_Code folder is a special ASP.NET folder that holds class
files specific to the website.
Note: The App_Code folder should only be used when managing your project
through the Website Project Model. If you are using the Web Application
Project Model, create a standard folder and add the classes to that. For
example, you could add a new folder named Classes, and place your code
there.
Next, add two new class files to the App_Code folder, one named
CustomIdentity.cs and one named CustomPrincipal.cs.
24. Figure 6: Add the CustomIdentity and CustomPrincipal Classes to Your
Project
The CustomIdentity class is responsible for implementing the IIdentity interface,
which defines the AuthenticationType, IsAuthenticated, and Name properties. In
addition to those required properties, we are interested in exposing the underlying
forms authentication ticket as well as properties for the user’s company name and
title. Enter the following code into the CustomIdentity class.
using System;
using System.Data;
using System.Configuration;
using System.Web;
using System.Web.Security;
using System.Web.UI;
using System.Web.UI.WebControls;
using System.Web.UI.WebControls.WebParts;
using System.Web.UI.HtmlControls;
public class CustomIdentity : System.Security.Principal.IIdentity
{
25. private FormsAuthenticationTicket _ticket;
public CustomIdentity(FormsAuthenticationTicket ticket)
{
_ticket = ticket;
}
public string AuthenticationType
{
get { return "Custom"; }
}
public bool IsAuthenticated
{
get { return true; }
}
public string Name
{
get { return _ticket.Name; }
}
public FormsAuthenticationTicket Ticket
{
get { return _ticket; }
}
public string CompanyName
{
get
{
string[] userDataPieces =
_ticket.UserData.Split("|".ToCharArray());
return userDataPieces[0];
}
}
public string Title
26. {
get
{
string[] userDataPieces =
_ticket.UserData.Split("|".ToCharArray());
return userDataPieces[1];
}
}
}
Note that the class includes a FormsAuthenticationTicket member variable
(_ticket) and that this ticket information must be supplied through the constructor.
This ticket data is used in returning the identity’s Name; its UserData property is
parsed to return the values for the CompanyName and Title properties.
Next, create the CustomPrincipal class. Since we are not concerned with roles at
this juncture, the CustomPrincipal class’s constructor accepts only a
CustomIdentity object; its IsInRole method always returns false.
using System;
using System.Data;
using System.Configuration;
using System.Web;
using System.Web.Security;
using System.Web.UI;
using System.Web.UI.WebControls;
using System.Web.UI.WebControls.WebParts;
using System.Web.UI.HtmlControls;
public class CustomPrincipal : System.Security.Principal.IPrincipal
{
private CustomIdentity _identity;
public CustomPrincipal(CustomIdentity identity)
{
_identity = identity;
}
public System.Security.Principal.IIdentity Identity
{
get { return _identity; }
27. }
public bool IsInRole(string role)
{
return false;
}
}
Assigning a CustomPrincipal Object to the
Incoming Request’s Security Context
We now have a class that extends the default IIdentity specification to include
CompanyName and Title properties, as well as a custom principal class that uses the
custom identity. We are ready to step into the ASP.NET pipeline and assign our
custom principal object to the incoming request’s security context.
The ASP.NET pipeline takes an incoming request and processes it through a number
of steps. At each step, a particular event is raised, making it possible for developers
to tap into the ASP.NET pipeline and modify the request at certain points in its
lifecycle. The FormsAuthenticationModule, for example, waits for ASP.NET to raise
the AuthenticateRequest event, at which point it inspects the incoming request for
an authentication ticket. If an authentication ticket is found, a GenericPrincipal
object is created and assigned to the HttpContext.User property.
After the AuthenticateRequest event, the ASP.NET pipeline raises the
PostAuthenticateRequest event, which is where we can replace the
GenericPrincipal object created by the FormsAuthenticationModule with an
instance of our CustomPrincipal object. Figure 7 depicts this workflow.
28. Figure 7: The GenericPrincipal is Replaced by a CustomPrincipal in the
PostAuthenticationRequest Event
In order to execute code in response to an ASP.NET pipeline event, we can either
create the appropriate event handler in Global.asax or create our own HTTP
Module. For this tutorial let’s create the event handler in Global.asax. Start by
adding Global.asax to your website. Right-click on the project name in Solution
Explorer and add an item of type Global Application Class named Global.asax.
29. Figure 8: Add a Global.asax File to Your Website
The default Global.asax template includes event handlers for a number of the
ASP.NET pipeline events, including the Start, End and Error event, among others.
Feel free to remove these event handlers, as we do not need them for this
application. The event we are interested in is PostAuthenticateRequest. Update
your Global.asax file so its markup looks similar to the following:
<%@ Application Language="C#" %>
<%@ Import Namespace="System.Security.Principal" %>
<%@ Import Namespace="System.Threading" %>
<script runat="server">
void Application_OnPostAuthenticateRequest(object sender, EventArgs
e)
{
// Get a reference to the current User
IPrincipal usr = HttpContext.Current.User;
// If we are dealing with an authenticated forms authentication
request
30. if (usr.Identity.IsAuthenticated &&
usr.Identity.AuthenticationType == "Forms")
{
FormsIdentity fIdent = usr.Identity as FormsIdentity;
// Create a CustomIdentity based on the
FormsAuthenticationTicket
CustomIdentity ci = new CustomIdentity(fIdent.Ticket);
// Create the CustomPrincipal
CustomPrincipal p = new CustomPrincipal(ci);
// Attach the CustomPrincipal to HttpContext.User and
Thread.CurrentPrincipal
HttpContext.Current.User = p;
Thread.CurrentPrincipal = p;
}
}
</script>
The Application_OnPostAuthenticateRequest method executes each time the
ASP.NET runtime raises the PostAuthenticateRequest event, which happens once
on each incoming page request. The event handler starts by checking to see if the
user is authenticated and was authenticated via forms authentication. If so, a new
CustomIdentity object is created and passed the current request’s authentication
ticket in its constructor. Following that, a CustomPrincipal object is created and
passed the just-created CustomIdentity object in its constructor. Finally, the current
request’s security context is assigned to the newly created CustomPrincipal object.
Note that the last step – associating the CustomPrincipal object with the request’s
security context – assigns the principal to two properties: HttpContext.User and
Thread.CurrentPrincipal. These two assignments are necessary because of the
way security contexts are handled in ASP.NET. The .NET Framework associates a
security context with each running thread; this information is available as an
IPrincipal object through the Thread object’s CurrentPrincipal property. What is
a confusing is that ASP.NET has its own security context information
(HttpContext.User).
In certain scenarios, the Thread.CurrentPrincipal property is examined when
determining the security context; in other scenarios, HttpContext.User is used. For
example, there are security features in .NET that allow developers to declaratively
state what users or roles can instantiate a class or invoke specific methods (see
Adding Authorization Rules to Business and Data Layers Using
31. PrincipalPermissionAttributes). Underneath the covers, these declarative
techniques determine the security context via the Thread.CurrentPrincipal
property.
In other scenarios, the HttpContext.User property is used. For example, in the
previous tutorial we used this property to display the currently logged on user’s
username. Clearly, then, it is imperative that the security context information in the
Thread.CurrentPrincipal and HttpContext.User properties match up.
The ASP.NET runtime automatically syncs these property values for us. However,
this synchronization occurs after the AuthenticateRequest event, but before the
PostAuthenticateRequest event. Consequently, when adding a custom principal in
the PostAuthenticateRequest event we need to be certain to manually assign the
Thread.CurrentPrincipal or else Thread.CurrentPrincipal and
HttpContext.User will be out of sync. See Context.User vs.
Thread.CurrentPrincipal for a more detailed discussion on this issue.
Accessing the CompanyName and Title
Properties
Whenever a request arrives and is dispatched to the ASP.NET engine, the
Application_OnPostAuthenticateRequest event handler in Global.asax will fire. If
the request has been successfully authenticated by the
FormsAuthenticationModule, the event handler will create a new CustomPrincipal
object with a CustomIdentity object based on the forms authentication ticket. With
this logic in place, accessing information about the currently logged on user’s
company name and title is incredibly straightforward.
Return to the Page_Load event handler in Default.aspx, where in Step 4 we wrote
code to retrieve the form authentication ticket and parse the UserData property in
order to display the user’s company name and title. With the CustomPrincipal and
CustomIdentity objects in use now, there’s no need to parse the values out of the
ticket’s UserData property. Instead, simply get a reference to the CustomIdentity
object and use its CompanyName and Title properties:
CustomIdentity ident = User.Identity as CustomIdentity;
if (ident != null)
WelcomeBackMessage.Text += string.Format(" You are the {0} of
{1}.", ident.Title, ident.CompanyName);
32. Summary
In this tutorial we examined how to customize the forms authentication system’s
settings via Web.config. We looked at how the authentication ticket’s expiration is
handled and how the encryption and validation safeguards are used to protect the
ticket from inspection and modification. Finally, we discussed using the
authentication ticket’s UserData property to store additional user information in the
ticket itself, and how to use custom principal and identity objects to expose this
information in a more developer-friendly manner.
This tutorial concludes our examination of forms authentication in ASP.NET. The next
tutorial starts our journey into the Membership framework.
Happy Programming!
Further Reading
For more information on the topics discussed in this tutorial, refer to the following
resources:
Dissecting Forms Authentication
Explained: Forms Authentication in ASP.NET 2.0
How To: Protect Forms Authentication in ASP.NET 2.0
Professional ASP.NET 2.0 Security, Membership, and Role Management
(ISBN: 978-0-7645-9698-8)
Securing Login Controls
The <authentication> Element
The <forms> Element for <authentication>
The <machineKey> Element
Understanding the Forms Authentication Ticket and Cookie
About the Author
Scott Mitchell, author of multiple ASP/ASP.NET books and founder of
4GuysFromRolla.com, has been working with Microsoft Web technologies since 1998.
Scott works as an independent consultant, trainer, and writer. His latest book is
Sams Teach Yourself ASP.NET 2.0 in 24 Hours. Scott can be reached at
mitchell@4guysfromrolla.com or via his blog at http://ScottOnWriting.NET.
Special Thanks To…
This tutorial series was reviewed by many helpful reviewers. Lead reviewer for this
tutorial was Alicja Maziarz. Interested in reviewing my upcoming MSDN articles? If
so, drop me a line at mitchell@4GuysFromRolla.com.