Tutorial on how to video capture a a meeting through screen casting
•
1 like•1,948 views

ZOOM - how to capture a meeting through screencasting

Recommended
More Related Content
What's hot
What's hot (19)
Similar to Tutorial on how to video capture a a meeting through screen casting
Similar to Tutorial on how to video capture a a meeting through screen casting (20)
Recently uploaded
Recently uploaded (20)
Tutorial on how to video capture a a meeting through screen casting
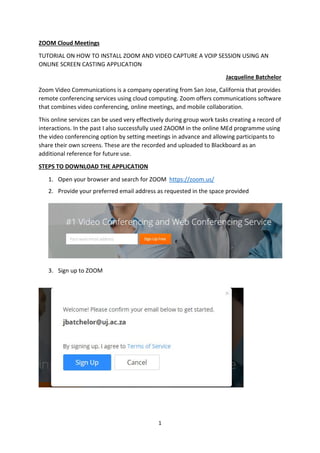
- 1. 1 ZOOM Cloud Meetings TUTORIAL ON HOW TO INSTALL ZOOM AND VIDEO CAPTURE A VOIP SESSION USING AN ONLINE SCREEN CASTING APPLICATION Jacqueline Batchelor Zoom Video Communications is a company operating from San Jose, California that provides remote conferencing services using cloud computing. Zoom offers communications software that combines video conferencing, online meetings, and mobile collaboration. This online services can be used very effectively during group work tasks creating a record of interactions. In the past I also successfully used ZAOOM in the online MEd programme using the video conferencing option by setting meetings in advance and allowing participants to share their own screens. These are the recorded and uploaded to Blackboard as an additional reference for future use. STEPS TO DOWNLOAD THE APPLICATION 1. Open your browser and search for ZOOM https://zoom.us/ 2. Provide your preferred email address as requested in the space provided 3. Sign up to ZOOM
- 2. 2 4. Once you entered your email address and clicked the Sign Up button an email will be sent to the address you provided. 5. Go to your email and open the particular post and activate your account. 6. Once you confirmed via email your wish to activate your account by clicking the link provided you will be required to create a password.
- 3. 3 7. You will now be taken through a series of steps to download an .exe file that will automatically download to your computer. Open the file once downloaded and elect to RUN the application. 8. This will install the application on your computer and create and icon on your desktop. HOW TO SCHEDULE A MEETING You can now launch the application by clicking on the icon. This will open a new window.
- 4. 4 Click the icon titled: Schedule
- 5. 5 Complete all of the fields as required. You will note the date of the meeting is scheduled for Thursday 1 March at 9 PM. You also have the option to create a calendar entry in Outlook.
- 6. 6 You now have the option to invite participants via Outlook Calendar to the meeting. All the details of the meeting is provided in the invitation. For participants to join a meeting they simply need to click on the URL provided. To join a meeting select the appropriate option. Select: Join and audio conference Make sure that your laptop correctly positioned to capture a head and shoulders image. Keep the background clutter clear. This is important because the image will be minimized when launching other documents and will only appear in the corner of the screen
- 7. 7 Note the menu buttons at the bottom of the screen. When you are ready select the RECORD button. You can now start talking. Once you are ready to introduce other resources such as an article or PowerPoint Presentation you can select the green SHARE SCREEN button. Make sure that you then select the appropriate application to share. You can now continue with the rest of your talk taking them through whichever resource you are sharing. To keep track of which document you are sharing you will notice a GREEN/RED border surrounding the shared item. You can pause the video at any time and resume at will. When you are finished with a particular document you can select the STOP SHARING appearing in red button appearing at the top of the screen. Resume your talk with selecting another window/document to share.
- 8. 8 The Video functions appear at the top of the screen and as you hover your mouse over the STOP SHARE button the full menu will appear with a drop down section labelled MORE. From here you can make adjustments if required. When sharing your screen you can position the video feed of you image anywhere on the screen. In the image above I positioned it at the bottom of the screen. Once you are done with your session you need to STOP SHARING whichever screen you are busy with to return to the main video menu that is at the bottom of the screen.
- 9. 9 You can end the video by shortly recapping the contents and stating what to expect in the next video. You can then stop the recording by selecting the STOP menu button at the bottom of the screen. Thereafter you need to select the END MEETING option at the bottom right side of the screen. A message will appear at the top of the screen that states that the video will be converted once the meeting ends. You now need to end the meeting. Select END MEETING FOR ALL. This will trigger a series of steps that leads to the conversion and saving of the video. Do not interrupt this process. Depending on the length of the video it can take up to 3 minutes.
- 10. 10 The recording files are automatically saved under MY DOCUMENTS in a folder named ZOOM. The data from the video is saved in various formats. The first is the audio only, the second contains only the video feed and the last format is an MP4 that combines audio, video and screen sharing clips. The last video originally labelled zoom_0 is the correct one to use for posting to Blackboard. Make sure that you rename it appropriately so that students know in advance what they will be accessing. It is good practice to warn users in advance as to the size of the video so that they can make arrangements in terms of data costs. You can find out the file size by right-click and selecting properties of the file which will display the information.