SlideShare a Scribd company logo
1 of 16
Download to read offline
Before Using How to Use Maintenance 
Trouble-shooting 
AIR PURIFIER 
<Desktop type> 
MODEL 
MA-EF503HS-U 
MA-EF303HS-U 
INSTRUCTION MANUAL 
Features 
 Plasma deodorization 
For odors that cannot be removed even with 
activated charcoal 
 HEPA dust filtration 
 Sensors to detect dust particles, 
pollen, and odors 
 Powerful and quiet 
 Hand-held remote control 
CONTENTS Page 
¡Safety precautions ..........................2 
¡Precautions .....................................4 
¡Names and functions of parts .........5 
¡Effective usage................................7 
¡Preparations....................................8 
Setting the filters 
Installing the batteries for 
remote controller 
¡Operation (viewing the monitor lamps)....9 
¡Changing the airflow .....................10 
¡Plasma air deodorization ..............11 
¡Off TIMER operation .....................11 
¡Monthly cleaning ...........................12 
¡Yearly cleaning..............................13 
¡Replacing the filters ......................14 
¡Troubleshooting.............................15 
¡Specifications ...............(back cover) 
™ 
In order to ensure correct usage, please read this 
instruction manual carefully, and retain it for future 
reference.
Safety precautions 
The following displays categorize the degree of danger when mishandled. 
WARNING 
CAUTION 
Possibility of serious injury and even death, if mishandled. 
Possibility of injury and damage to household furniture and surroundings. 
Do not repair, 
disassemble or 
modify. 
AC120V 
WARNING 
The following symbols are defined as follows: 
Prohibited Do not touch 
Do not use 
Do not near water 
disassemble Do not get wet 
Always follow 
Remove the 
power plug 
Fire and/or electrical shock 
may occur as a result. 
For repair, contact your dealer of 
purchase or Mitsubishi Electric. 
Do not damage the power cord. 
 Do not coat or bundle. 
 Do not place objects on top of 
the cord. 
 Do not remove the power plug by 
pulling on the cord. 
Fire, electrical shock, and/or 
damage may occur as a result. 
Do not use damaged power cord 
or plug. Do not use damaged 
power outlet where the plug 
cannot be inserted securely. 
Electrical shock, short circuit 
and/or fire may occur as a 
result. 
Do not wash the Plasma 
unit. 
Using the Plasma unit when 
wet may cause fire and/or 
electrical shock. 
Do not insert finger or 
foreign objects into the 
dust sensor. 
Electrical shock may occur as 
a result. 
Remove the power plug 
when cleaning. 
Furthermore, never handle the 
power plug with wet hands or 
get the plug wet. 
Electrical shock and/or injury 
may occur as a result. 
Use an AC120V power outlet. 
Electrical shock, short circuit 
and/or fire may occur as a 
result. 
Periodically remove dust 
from the power plug with a 
dry cloth. 
Dust build-up can cause bad 
insulation and a fire may occur 
as a result. 
2 
To reduce the risk of electric 
shock, this equipment has a 
polarized plug (one blade is 
wider than the other). This plug 
will fit in a polarized outlet only 
one way. If the plug does not fit 
fully in the outlet, reverse the 
plug. If it still does not fit, 
contact qualified personnel to 
install the proper outlet. Do not 
alter the plug in any way.
CAUTION 
Gas 
Gas 
Gas 
Oil Oil 
Oil 
Spray 
Before Using 
3 
Do not allow the unit to intake 
flammable gases. 
Do not use where there is 
accumulation of such flammable 
gases (factories, hair salons, etc.). 
Explosion and/or fire may 
occur as a result. 
Do not install in a location 
such as a bathroom where the 
unit may get wet, and avoid 
places with high humidity. 
Electrical shock and/or 
malfunction may occur as a result. 
If the unit gets wet for some reason, 
stop operation, remove the power 
plug and contact your dealer of 
purchase or Mitsubishi Electric  
Electronics USA, Inc.. 
Do not use in a location 
where there is lampsmoke, 
such as from machine oil, 
etc. 
The unit may crack, resulting in 
electrical shock and/or 
malfunction. 
Do not insert fingers or foreign 
objects into the intake grill, the 
exhaust air port, or any small 
openings of the unit interior. 
Electrical shock, malfunction 
and/or injury may occur as a result. 
Do not wipe with benzene or 
paint thinner, and do not spray 
insecticides or deodorizers, 
etc., onto the unit. 
Electrical shock, fire and/or 
cracking may occur as a result. 
Do not remove the HEPA 
filter with the unit laying on 
its back. 
Dust may enter inside the unit, 
and fire and/or electrical 
shock may occur as a result. 
Do not use damaged filters, or 
operate the unit without a filter. 
Contact your dealer or Mitsubishi 
Electric for a replacement. 
Fire and/or electrical shock 
may occur as a result. 
Do not touch the electric 
poles of the Plasma unit. 
Injury may occur as a result. 
Ventilate periodically when 
using the unit with a 
heating appliance, etc. 
Insufficient ventilation may 
cause CO intoxication. 
 Do not use rechargeable batteries. 
 Make sure that the and are correctly aligned. 
 When replacing, always replace batteries at the same time using 
the same type. 
 If the electrolyte from the alkaline batteries comes into contact with 
skin, wash thoroughly with water. If the electrolyte accidentally 
enters your eye, flush with water and seek immediate medical 
attention. 
Remove the power plug 
when not using for an 
extended period of time. 
Insulation may deteriorate, 
causing short circuit, fire and/or 
electrical shock as a result. 
Use the batteries correctly by following the items below. 
Injury and/or malfunction may occur if mishandled. 
Safety precautions
4 
Precautions This air purifier is for household use only. Do not use for business purposes. 
Do not block the intake grill or 
the exhaust air ports. 
Malfunction may occur as a result. 
Do not use if the unit is laying 
on its back or front. 
Malfunction may occur as a result. 
Do not use with the intake 
grill, the filters or the Plasma 
unit removed. 
Malfunction may occur as a result. 
Do not use the unit as a 
ventilation fan or range hood. 
This may drastically reduce the 
service life of the filter as well as 
cause deformation, discoloration 
and/or malfunction. 
If the remote controller comes into contact with a 
liquid, remove batteries and dry thoroughly. 
If the remote controller becomes inoperable, contact your dealer 
of purchase or Mitsubishi Electric. 
Take note of the following when installing the unit 
Do not install near or on top of 
hot objects, such as a stove, 
etc. 
Malfunction, deformation and/or 
discoloration may occur as a result. 
Keep unit at least 3.3 feet (1m) away from 
televisions, cordless telephones, air 
conditioners, computers, incandescent 
bulbs, fluorescent lighting, etc. 
Electrical wave interference may 
occur, resulting in the remote 
control becoming inoperable. 
Do not use in a location 
exposed to direct sunlight 
Deformation and/or discoloration 
may occur as a result. 
Leave space around the unit 
2 feet (60 cm) or more above the unit and 0.7 
feet (20 cm) or more on the sides and back. 
2 feet (60 cm) 
0.7 feet or more 
(20 cm) 
or more 
0.7 feet (20 cm) 
or more 
0.7 feet (20 cm) 
or more 
Walls and/or ceiling may become 
dirty as a result. 
When carrying 
Turn the power switch to OFF, 
unplug the unit, and carry the 
unit by the handle. 
Do not press strongly against 
the control panel when carrying. 
Notes 
How strong are the electromagnetic waves discharged by this air purifier? 
The electromagnetic waves produced by this product are lower than mobile phones, and are harmless to the body 
and medical equipment. 
Can the unit remove odors of newly constructed houses? 
The unit may not be able to completely remove odors if the discharge of odors is too much such as with new paint or 
carpet glues.
Main unit Accessories 
Control panel 
Table stand 
Grill-release button 
Press to remove the grill. 
(On each side of unit) 
6~7 
Before Using 
5 
Names and functions of parts 
Odor sensor 
Detects smell of cigarettes, etc. 
Reset Switch 
Press after 
replacing the filter. 
Activated charcoal filter 
Remote controller 
Two AA type 
batteries for the 
remote controller 
Plasma unit 
HEPA filter 
Intake grill 
Dust sensor 
Detects polluted air such 
as pollen, etc. 
Air fan 
Spring clips 
(On each side 
of Plasma unit) 
What is a HEPA filter? 
High Efficiency Particulate Air filter 
The HEPA filter is a high performance filter 
than can catch up to 99.97% of all particles 
as small as 0.3 micron in diameter. 
Handle 
Exhaust air 
port 
Power cord 
Removing 
Lay the unit on its back 
side, and then remove the 
stand by pressing table 
stand tabs. 
Replacing 
Hook the tabs on the front 
side of the table stand, 
and then press in the rear 
side of the stand. 
Precautions Names and functions of parts 
6~7 
Removing and replacing the unit table stand
PLASMA 
REPLACE FILTER 
Control panel 
Plasma deodorization lamp 
ON… Plasma deodorization in 
process 
Flashing…Error 13 
Remote sensor 
How to use the 
remote controller 9 
Odor sensor 
Filter replacement lamp 
When lit, it indicates that the filters 
should be replaced. 
14 
Plasma air deodorization 11 
ODOR 
MICRO 
DUST POLLEN 
Viewing the monitor lamps 9 
Odor monitor (odor sensor) 
Shows the level of air pollution caused by odor 
of cigarette smoke, etc. 
Microdust Monitor (dust sensor) 
Displays the level of air pollution caused by tiny 
particles such as cigarette smoke, etc. 
Pollen Monitor (dust sensor) 
Displays the level of air pollution caused by 
large particles such as pollen, dead mites, 
dust, etc. 
Dusts which are harmful to the lungs 
Small particles of cigarette smoke 
How do the sensors work? 
Odor sensor 
Using a semiconductor sensor, gases 
from odor ingredients are detected. The 
sensor will react to a breeze from air 
conditioners, fans, etc., as well as 
odorless gases and perfumes. 
Feces or dead body of mites, dust 
Pollen 
Dust sensor 
¡MICRODUST 
Using an optical sensor, the number of particles less than 
approximately 1 micron is detected. 
¡POLLEN 
Using an optical sensor, the number of particles more than 
approximately 1 micron is detected. 
About microdust and pollen 
0.01 0.1 1 10 100 (micron) 
MICRODUST 
Small particles such cigarette smoke, etc. 
(Mainly particles smaller than 1 micron) 
POLLEN 
Large particles such as pollen, dead mites, etc. 
(Mainly particles of larger than 1 micron) 
Replacing the filters 
6 
Names and functions of parts (continued)
Before Using 
7 
AUTO FAN 
PLASMA TIMER 
Plasma air deodorization switch 
(on the remote only) 
¡Plasma air deodorization 
function ON 
¡Plasma air deodorization 
function OFF 
NORMAL 
Operation mode button 10 
¡Switches operation modes. 
POLLEN 
HOUR MIN LOW MED HIGH MAX GUARD 
TIMER FAN AUTO 
POWER 
POWER 
ON/OFF 
11 10 
10 
15 15 
Off TIMER operation 
Off TIMER lamps 
Show the remaining 
operation time (hours). 
Off TIMER button 
¡Switches the timer ON 
¡Switches the timer OFF 
Changing the airflow 
FAN level indicator 
ON: The fan level in 
operation is displayed. 
Flashing: Error 
FAN button 
¡Switches operation modes 
and airflow volume 
Changing the airflow 
Operation 9 
POWER button 
¡Turns the unit ON 
¡Turns the unit OFF 
Operation mode lamps 
POLLEN GUARD lamp ON: Pollen guard in progress 
NORMAL lamp ON: Normal operation in progress 
Flashing: Error 
AUTO button 
Switches operation modes 
Remote control operation panel 
11 
11 
9 
Operation switch 
¡Turns the unit ON 
¡Turns the unit OFF 
Off TIMER switch 
¡Switches the timer ON 
¡Switches the timer OFF 
Names and functions of parts Effective usage 
10 
Table-top POLLEN GUARD operation 
POLLEN GUARD, which reacts to even the 
slightest traces of pollen, is recommended. 
Since scattered dust and pollen fall gradually, 
install the unit in a low location for the best 
result. 
Running the unit all day is also recommended 
if you are concerned about pollen. 
Use by installing on a high platform 
Since cigarette smoke rises directly upward, 
installing the unit in a high location is 
recommended such as on a counter or 
dresser. 
(Take caution so that the unit does not fall.) 
Effective usage 
For the best results from your product, install the unit where there is good air 
circulation. 
If you are 
concerned 
about 
pollen 
If you 
are 
concerned 
about 
smoke
1 
2 
3 
4 
5 
(White particles within the activated 
charcoal filter are titanium oxide, not 
mildew.) 
12~13 
+ 
- 
+ 
- 
1 
2 
3 
 Ensure that the proper polarity is observed. 
Caution 
8 
Preparation 
Setting the filters 
Remove the plastics from the HEPA filter and the 
activated charcoal filter before use. 
Press the grill-release buttons, and 
then remove the intake grill. 
Both sides 
Remove the HEPA filter. 
Remove 
the plastic 
Remove the Plasma unit. 
Hold the spring 
clips, and remove 
one side at a time. Hold with both 
hands, and pull 
to remove. 
Install the activated charcoal filter. 
Remove the 
plastic before 
installing. 
Replace the Plasma unit, the HEPA 
filter, and the intake grill. 
Installing the batteries for 
the remote controller 
While pushing the cover, slide it 
forward. 
Insert the batteries. 
Two AA type batteries 
Close the cover by sliding it backward 
until it snaps shut. 
Use dry cell batteries in a proper manner. 
 Do not use rechargeable batteries. 
 Make sure that the positive and negative poles 
are correctly aligned. 
 When replacing, always replace with two new 
batteries of the same type. 
 Should your skin come in contact with the 
electrolyte of the alkaline dry cell batteries, 
wash the affected area with water. Should the 
electrolyte enter your eye, immediately contact 
a doctor. 
Wrong use may cause injury or malfunction.
Preparation Operation 
Before Using 
9 
On the main unit 
Press the power button on the main unit to turn on the 
air purifier. 
NORMAL 
POLLEN 
Operation 
HOUR MIN LOW MED HIGH MAX GUARD 
TIMER FAN AUTO 
POWER 
ON/OFF 
ON OFF Press 
beep, beep POWER beep, beeep 
ON/OFF 
Using the remote controller 
Press the power button on the remote controller 
to turn on the air purifier. The operation is the 
same as on the main unit. 
POWER POWER 
AUTO FAN 
PLASMA TIMER 
Press 
 Each time you press this button, the unit turns ON 
or OFF. 
 Both the operation mode lamp and the monitor 
lamp must be ON. 
 When you plug in the power cord, the monitor 
lamps blink for approximately two minutes while 
the sensors stabilize. 
ODOR 
MICRO 
DUST POLLEN 
How to use the remote controller 
The remote controller allows you to operate the unit 
from a remote place. 
Aim the remote controller toward the main unit 
and press the switch. The maximum range of 
operation is 23 feet (7 m). Remote sensor 
Remote controller 
 Do not cover the remote 
sensor with cloths, etc. 
 If the main unit does not respond properly to the 
signals from the remote controller, replace with 
the new batteries. 
 Make sure the remote sensor and the remote 
controller are in sight of one another. 
Remote controller operation may not be possible in 
the following situations: 
 In areas where the unit is subjected to direct sunlight. 
The infrared rays of the sunlight may effect the remote 
sensor on the unit 
 In rooms with inverter lighting for lower power consumption. 
The noise from the inverter lighting may effect the remote 
sensor on the unit. 
Viewing the monitor lamps 
The lamps light up (four levels) depending on amount of air contaminants or odors present. 
FAN SPEED 
MAX 
Clean air Dirty air MIN 
How to Use
You can select between FAN (manual) and AUTO operation modes. 
NORMAL 
POLLEN 
HOUR MIN LOW MED HIGH MAX GUARD 
TIMER FAN AUTO 
POWER 
ON/OFF 
FAN AUTO 
AUTO FAN 
MIN LOW MED HIGH MAX 
NORMAL 
POLLEN 
GUARD 
POWER 
AUTO FAN 
PLASMA TIMER 
beep 
beep 
beep 
10 
Changing the airflow 
On the main unit Using the remote controller 
You can select from 5 airflow volumes or AUTO. 
Press 
one of the buttons 
You can select the airflow volume from the 
remote controller. The operation is the same as 
with the main unit. 
Press 
one of the buttons 
FAN 
You can select 
from 5 airflow 
volumes. 
 The airflow changes each time 
the button is pressed, and the 
lamp of the chosen volume lights 
up. 
AUTO 
You can select 
from POLLEN 
GUARD and 
NORMAL. 
 Operation switches every time 
the button is pressed, and the 
selected operation mode lamp 
lights. 
 Operation is automatically 
adjusted to the appropriate 
airflow volume according to the 
odor monitor, microdust monitor, 
and pollen monitor. 
 MIN or LOW 
When sleeping 
 HIGH or MAX 
When house cleaning 
 POLLEN GUARD 
 The sensor is set to 
supersensitive to react to even the 
slightest traces of pollen. 
 The fan speed is faster than the 
NORMAL operation for easier 
intake of large particles such as 
pollen, etc. 
 NORMAL 
 The level of air pollution in the 
room is monitored using the odor 
and dust sensors, and the 
appropriate airflow volume is 
automatically selected. 
 When the air is clean, the fan will 
stop. 
 The unit will return to the previously set mode even after turning the unit off. 
The unit will return to the previously set mode even when reinserting the power plug or after having a power failure.
beep beeep 
NORMAL 
POLLEN 
POWER 
HOUR MIN LOW MED HIGH MAX GUARD 
TIMER FAN AUTO 
POWER 
ON/OFF 
AUTO FAN 
PLASMA TIMER 
POWER 
AUTO FAN 
PLASMA TIMER 
PLASMA 
TIMER 
TIMER 
 The remaining operation time can be changed. 
beeep beep beep beep 
Continuous HOUR 
Operation 
(Lamp off) 
How to Use 
11 
Plasma air deodorization 
The unit uses the odor sensor to monitor the level of air pollution, then automatically activates the Plasma to break up odor ingredients in the air. 
Using the remote controller 
You can turn the Plasma deodorization function ON or OFF. 
 Each time you press this button, the Plasma unit 
turns ON or OFF. 
 Turn the Plasma deodorization lamp ON. 
 The unit will return to the previously set operation 
mode when power is interrupted. 
 Since the unit operates intermittently during the 
Plasma deodorization, a hissing noise may be 
heard, and the unit may also stop at times. If 
the noise becomes irritating, turn off the feature 
by pressing the PLASMA button on the remote 
control. 
 When the Plasma deodorization lamp is 
blinking, turn the unit off, and clean the Plasma 
unit. 
To operate from the main unit, you can turn the 
Plasma deodorization ON or OFF using the 
following procedure: 
 When the power is turned on, press and hold 
the AUTO button, and press the POWER 
switch. 
Off TIMER operation 
On the main unit 
You can set the unit so that it turns off after running 
for a preset time. (1, 2, 4 hours) 
Using the remote controller 
You can also use the remote controller to 
set/deactivate the off TIMER. The operation is the 
same as on the main unit. 
 The selected Off TIMER lamp lights. 
 The Off TIMER lamp will display the remaining 
operation time and will switch as time passes. 
Changing the airflow Plasma air deodorization/Off timer operation 
ON OFF 
Press 
Press 
Press 
13
Cleaning Sensors, the HEPA 
filter, and main unit 
Cleaning the Plasma unit 
Cleaning the sensors Cleaning the HEPA filter 
1 
2 
3 
4 
14 
remove dust by taking care not 
to tear the HEPA filter surface. 
Do not wash. The filter cannot 
be reused if washed or after 
becoming wet. 
Direction of 
airflow 
12 
Maintenance 
Monthly cleaning 
For the best performance from your unit, clean approximately once a month. 
Both sides 
Using the soft 
nozzle brush of a 
vacuum cleaner, 
Odor sensor (control panel) 
Remove dust using 
the nozzle of a 
vacuum cleaner. 
Remove surrounding dust 
using the nozzle brush of a 
vacuum cleaner. 
Dust sensor surroundings 
Cleaning the main unit 
Intake grill 
Remove dust 
using a nozzle 
brush of a 
vacuum cleaner. 
For stubborn dirt, remove 
the intake grill, and wash 
with a soft sponge. 
Thoroughly dry before 
replacing. 
Main unit 
Dry-wipe with 
a soft cloth. 
For stubborn dirt, 
wipe with a cloth 
dampened with 
water. 
Press the grill release buttons on 
each side, and remove the intake grill. 
Remove the HEPA filter and clean. 
Replace the HEPA filter. 
8 
Replace the HEPA filter with the 
logo facing you and 
arrows pointing away from you. 
Replace the intake grill. 
Hook the five tabs on the upper 
side of the intake grill, and press 
in the lower side until the release 
buttons snap securely. 
Monthly 
Yearly 
Replacing the filters 
WARNING 
Before cleaning the unit, 
turn off the power and 
remove the power plug. 
Electrical shock and/or injury 
may occur as a result.
1 
2 
3 
4 
5 
1 
2 
3 
Maintenance 
13 
WARNING 
Before cleaning the unit, turn off the power and 
remove the power plug. 
Electrical shock and/or injury may occur as a result. 
Yearly cleaning 
Clean at least once a year. Clean the Plasma unit if the Plasma deodorization lamp flashes. 
Cleaning the dust sensor 
Remove the cover by depressing 
the cover spring. 
Left side of 
main unit 
Clean the sensor lenses. 
Use a dry cotton swab 
and clean the two lenses. 
Replace the cover. 
Cleaning the Plasma unit 
Press the grill release buttons on 
each side; remove the intake grill, 
and then remove the HEPA filter. 
Remove the Plasma unit. 
Hold the spring 
clips, and remove 
one side at a time. 
Pull the Plasma unit 
towards you to 
remove. 
Plasma unit 
Do not pull by force. Malfunction 
may occur as a result. 
Clean the Plasma unit. 
Use a toothbrush, and lightly flick 
off the tips of the electric poles. 
Lightly flick off the tips. Using force may 
cause the Plasma unit to deform, 
resulting in malfunction of the unit. 
Replace the Plasma unit. 
Position the Plasma unit using 
both hands, and press in each 
spring clip until you hear a click. 
Push in 
the lower 
section. 
Replace the HEPA filter and the 
intake grill. 
Monthly cleaning Yearly cleaning 
8
Color of cigarette ingredients 
REPLACE FILTERS 
Available from Mitsubishi Electric 
www.plasmapure.com 
Please replace the HEPA filter and the activated charcoal 
filter with new filters when the color on the surface of the 
HEPA filter matches the color indicated above. 
Reset Switch 
1 
2 
3 
4 
5 
6 
Reset switch 
Set vertically. 
(There is no front or back.) 
Beep 
14 
Use a ball point pen, 
or a similar pointed 
object, and press 
until a beep is heard. 
Maintenance (continued) 
Replacing the filters 
The filter replacement lamp notifies you of the replacement period of the HEPA filter and the activated charcoal filter. 
Replace both the HEPA filter and the activated charcoal filter at the same time. 
Replacement period 
Color of household dust 
 The service life of the filters varies depending 
on the usage environment, and conditions. 
 The HEPA filter and the activated charcoal filter 
cannot be reused. Always replace old filters 
with new filters. 
 When smoking large amount of cigarettes, odor 
may adhere to the filter and main unit. In this 
case, clean the main unit, and replace the filters. 
Separately sold part: 
Replacement filter set 
(HEPA filter/activated charcoal filter) 
Model MAPR-E837HFT 
Code no. 5D4 C06 
To order parts, contact your dealer of purchase 
or Mitsubishi Electric @ www.plasmapure.com 
Remove the intake grill and the 
HEPA filter. 
Remove the Plasma unit. 
Replace the activated charcoal 
filter. 
Replace the Plasma unit and 
mount a new HEPA filter. 
Insert the power plug and press 
the Reset Switch. 
Replace the intake grill. 
12~13 
Although the replacement period depends on 
the usage environment and conditions, the 
lamp will light after approximately 5 years 
when using the unit on constant MIN fan 
speed. 
(In the case of MAX, the lamp will light in 
approximately 1/4 the time.) 
 When the filter replacement lamp illuminates 
 When the HEPA filter becomes dirty and the 
color is about the same as that indicated on 
the label
Is the unit installed on an unstable or 
unlevel surface? Install on a level and stable surface. 
Reinsert the power plug into the power 
outlet. 
Press the power switch and turn on the 
power. 
Clean the sensors. 
Replace the HEPA filter and the 
activated charcoal filter. 
Clean the sensors. 
Replace the HEPA filter and the 
activated charcoal filter. 
Remove the plastic and replace. 
Reset the intake grill, the HEPA filter 
and the activated charcoal filter. 
Clean the Plasma unit. 
Replace with new batteries, or correctly set 
the batteries observing the proper polarity. 
12~13 
14 
12~13 
14 
8 
13 
8 
Symptom Cause Remedy 
Main unit vibrates 
heavily 
There is no air intake 
Little monitor response 
Odor and smoke are 
not completely 
removed 
Is the power plug securely inserted into 
the power outlet? 
Is the fan level lamp on? 
(Is the power on?) 
Are the sensors dusty? 
Is the HEPA filter or the activated 
charcoal filter dirty? 
Are the sensors dusty? 
Fan noise and 
vibration are louder 
than before 
One of the following lamps flash: 
FAN/POLLEN GUARD/NORMAL 
Plasma deodorization 
lamp flashes 
Is the HEPA filter or the activated 
charcoal filter dirty? 
Is the activated charcoal filter still 
wrapped in plastic? 
Are the intake grill, the HEPA filter and 
the activated charcoal filter properly set? 
There is an abnormal electrical 
discharge. 
The remote controller 
does not work 
Have the batteries been completely depleted or are 
the and of the batteries set correctly? 
 The following symptoms are not malfunctions. 
Symptom Cause 
The air fan does not turn, or there 
is no air discharge 
A small hissing noise is heard, or there 
is a smell of ozone during the Plasma 
deodorization 
The monitors do not change much 
(Odor monitor, microdust monitor and 
pollen monitor) 
The odor monitor does not change 
even when an odor can be noticed 
Is the unit operating in AUTO (NORMAL) mode? 
The unit will stop operation when the air is clean. 
During the Plasma deodorization, you may hear a small hissing noise or notice an ozone smell. 
(The level of noise and degree of the smell of ozone will vary depending on the environment. 
The generated ozone is of low concentration and is harmless to the body.) 
Is the room too large? 
Use the unit within the range of the applicable floor area. 
Checking monitor operation: 
 Rub tissue paper in front 
of the main unit to 
discharge dust. 
 Blow cigarette smoke. 
If there is a large volume of dust or odor, it may 
take some time for the air to become clean. 
The sensitivity of the sensor differs depending on odor ingredients, and the 
monitor display may at times remain unchanged. 
The monitor lamp flashes The monitor lamp will flash until the sensors become stable, even if the 
power is turned on immediately after inserting the power plug. 
The monitor lamp flashes even when 
the room is clean 
The sensor may at times respond to a breeze from air conditioners within 
the room, and gases that are unnoticeable to the human smell. 
Should the problem persist after having checked the above list, stop using the unit, remove the power plug and contact 
your dealer of purchase or Mitsubishi Electric. 
Maintenance 
Trouble-shooting 
15 
Troubleshooting 
Replacing the filters Troubleshooting
MA-EF303HS-U 
PPIMA11/00-04K 
T946Z023H01 00/11 
Power consumption 
Airflow volume 
Room size 
Weight 
Dimension 
(H×W×D) 
Power cord length 
Safety devices 
Accessories 
MA-EF503HS-U 
AC120V 60Hz 
233 Sq.FT 155 Sq.FT 
13 ft × 18 ft 11 ft × 14 ft 
17.1lbs (7.6 kg) 
15-3/4 × 22-7/32 × 7-7/8 
(400mm × 564mm × 200mm) 
8.2 ft (2.5m) 
MAX 
HIGH 
MED 
LOW 
MIN 
MAX 
HIGH 
MED 
LOW 
MIN 
36W 
26W 
19W 
17W 
16W 
106 CFM 
90 CFM 
65 CFM 
46 CFM 
34 CFM 
66W 
28W 
19W 
17W 
16W 
160 CFM 
102 CFM 
65 CFM 
46 CFM 
34 CFM 
MITSUBISHI ELECTRIC AIR PURIFIER MA-EF503HS-U • MA-EF303HS-U 
Model 
Power supply 
Current fuse (2A), motor overheat protection device (operational temp: 212°F (100°C)), 
abnormal electric discharge protection device 
Remote controller (type AA battery × 2) 
Specifications 
For more information, visit 
www.plasmapure.com 
or call 1-866-475-2762

More Related Content

What's hot

John deere la150 lawn tractor service repair manual
John deere la150 lawn tractor service repair manualJohn deere la150 lawn tractor service repair manual
John deere la150 lawn tractor service repair manualfjsjekkdmnem
 
Electrical Safety1
Electrical Safety1Electrical Safety1
Electrical Safety1jboullemet
 
도시바프린터 TEC B-852 열전사감열 바코드프린터 A4사이즈 바코드라벨인쇄 매뉴얼
도시바프린터 TEC B-852 열전사감열 바코드프린터 A4사이즈 바코드라벨인쇄 매뉴얼도시바프린터 TEC B-852 열전사감열 바코드프린터 A4사이즈 바코드라벨인쇄 매뉴얼
도시바프린터 TEC B-852 열전사감열 바코드프린터 A4사이즈 바코드라벨인쇄 매뉴얼HION IT
 
John deere gt245 lawn garden tractor service repair manual
John deere gt245 lawn garden tractor service repair manualJohn deere gt245 lawn garden tractor service repair manual
John deere gt245 lawn garden tractor service repair manualfjskedsxmmem
 
John deere gt225 lawn garden tractor service repair manual
John deere gt225 lawn garden tractor service repair manualJohn deere gt225 lawn garden tractor service repair manual
John deere gt225 lawn garden tractor service repair manualfjskekmdm
 
John deere gt235 e lawn garden tractor service repair manual
John deere gt235 e lawn garden tractor service repair manualJohn deere gt235 e lawn garden tractor service repair manual
John deere gt235 e lawn garden tractor service repair manualfjskemdme
 
John deere gt235 lawn garden tractor service repair manual
John deere gt235 lawn garden tractor service repair manualJohn deere gt235 lawn garden tractor service repair manual
John deere gt235 lawn garden tractor service repair manualfjjskekdm
 
Generic user guide
Generic user guideGeneric user guide
Generic user guidemorasilva
 
Eureka Upright Vacuum Cleaner Owner's Guide- 4870 Series
Eureka Upright Vacuum Cleaner Owner's Guide- 4870 SeriesEureka Upright Vacuum Cleaner Owner's Guide- 4870 Series
Eureka Upright Vacuum Cleaner Owner's Guide- 4870 SeriesSergei Paleichuk
 
Avtron Dome Camera Aa 6003-fs-manual
Avtron Dome Camera Aa 6003-fs-manualAvtron Dome Camera Aa 6003-fs-manual
Avtron Dome Camera Aa 6003-fs-manualAvtron
 
E 070 lipo laser slimming machine
E 070 lipo laser slimming machineE 070 lipo laser slimming machine
E 070 lipo laser slimming machineE-beauty
 
Hitachi eh1600 rigid dump truck (haul truck) service repair manual
Hitachi eh1600 rigid dump truck (haul truck) service repair manualHitachi eh1600 rigid dump truck (haul truck) service repair manual
Hitachi eh1600 rigid dump truck (haul truck) service repair manualfksefkskemm
 
Volvo ew55 b compact wheel excavator service repair manual
Volvo ew55 b compact wheel excavator service repair manualVolvo ew55 b compact wheel excavator service repair manual
Volvo ew55 b compact wheel excavator service repair manualfhsjejfksemm
 
Buddy High Volume Filling and Capping Machines
Buddy High Volume Filling and Capping Machines Buddy High Volume Filling and Capping Machines
Buddy High Volume Filling and Capping Machines RogerQi2
 

What's hot (15)

John deere la150 lawn tractor service repair manual
John deere la150 lawn tractor service repair manualJohn deere la150 lawn tractor service repair manual
John deere la150 lawn tractor service repair manual
 
Electrical Safety1
Electrical Safety1Electrical Safety1
Electrical Safety1
 
도시바프린터 TEC B-852 열전사감열 바코드프린터 A4사이즈 바코드라벨인쇄 매뉴얼
도시바프린터 TEC B-852 열전사감열 바코드프린터 A4사이즈 바코드라벨인쇄 매뉴얼도시바프린터 TEC B-852 열전사감열 바코드프린터 A4사이즈 바코드라벨인쇄 매뉴얼
도시바프린터 TEC B-852 열전사감열 바코드프린터 A4사이즈 바코드라벨인쇄 매뉴얼
 
John deere gt245 lawn garden tractor service repair manual
John deere gt245 lawn garden tractor service repair manualJohn deere gt245 lawn garden tractor service repair manual
John deere gt245 lawn garden tractor service repair manual
 
John deere gt225 lawn garden tractor service repair manual
John deere gt225 lawn garden tractor service repair manualJohn deere gt225 lawn garden tractor service repair manual
John deere gt225 lawn garden tractor service repair manual
 
John deere gt235 e lawn garden tractor service repair manual
John deere gt235 e lawn garden tractor service repair manualJohn deere gt235 e lawn garden tractor service repair manual
John deere gt235 e lawn garden tractor service repair manual
 
John deere gt235 lawn garden tractor service repair manual
John deere gt235 lawn garden tractor service repair manualJohn deere gt235 lawn garden tractor service repair manual
John deere gt235 lawn garden tractor service repair manual
 
Generic user guide
Generic user guideGeneric user guide
Generic user guide
 
Eureka Upright Vacuum Cleaner Owner's Guide- 4870 Series
Eureka Upright Vacuum Cleaner Owner's Guide- 4870 SeriesEureka Upright Vacuum Cleaner Owner's Guide- 4870 Series
Eureka Upright Vacuum Cleaner Owner's Guide- 4870 Series
 
Avtron Dome Camera Aa 6003-fs-manual
Avtron Dome Camera Aa 6003-fs-manualAvtron Dome Camera Aa 6003-fs-manual
Avtron Dome Camera Aa 6003-fs-manual
 
E 070 lipo laser slimming machine
E 070 lipo laser slimming machineE 070 lipo laser slimming machine
E 070 lipo laser slimming machine
 
Máy cắt sắt Makita mt241 (2)
Máy cắt sắt Makita mt241 (2)Máy cắt sắt Makita mt241 (2)
Máy cắt sắt Makita mt241 (2)
 
Hitachi eh1600 rigid dump truck (haul truck) service repair manual
Hitachi eh1600 rigid dump truck (haul truck) service repair manualHitachi eh1600 rigid dump truck (haul truck) service repair manual
Hitachi eh1600 rigid dump truck (haul truck) service repair manual
 
Volvo ew55 b compact wheel excavator service repair manual
Volvo ew55 b compact wheel excavator service repair manualVolvo ew55 b compact wheel excavator service repair manual
Volvo ew55 b compact wheel excavator service repair manual
 
Buddy High Volume Filling and Capping Machines
Buddy High Volume Filling and Capping Machines Buddy High Volume Filling and Capping Machines
Buddy High Volume Filling and Capping Machines
 

Viewers also liked

Remembering the Missile man
Remembering the Missile manRemembering the Missile man
Remembering the Missile manGaurav Kabra
 
Impidamos un matrimonio en el día de san valentín
Impidamos un matrimonio en el día de san valentínImpidamos un matrimonio en el día de san valentín
Impidamos un matrimonio en el día de san valentínSami Sami
 
H2i Residential Cooling and Heating System Carried By Unique Indoor Comfort L...
H2i Residential Cooling and Heating System Carried By Unique Indoor Comfort L...H2i Residential Cooling and Heating System Carried By Unique Indoor Comfort L...
H2i Residential Cooling and Heating System Carried By Unique Indoor Comfort L...UniqueIndoorComfortLibertyville
 

Viewers also liked (9)

Remembering the Missile man
Remembering the Missile manRemembering the Missile man
Remembering the Missile man
 
Impidamos un matrimonio en el día de san valentín
Impidamos un matrimonio en el día de san valentínImpidamos un matrimonio en el día de san valentín
Impidamos un matrimonio en el día de san valentín
 
2009 ul jet towel brochure 9 09
2009 ul jet towel brochure 9 092009 ul jet towel brochure 9 09
2009 ul jet towel brochure 9 09
 
H2i Residential Cooling and Heating System Carried By Unique Indoor Comfort L...
H2i Residential Cooling and Heating System Carried By Unique Indoor Comfort L...H2i Residential Cooling and Heating System Carried By Unique Indoor Comfort L...
H2i Residential Cooling and Heating System Carried By Unique Indoor Comfort L...
 
The Booze quiz
The Booze quizThe Booze quiz
The Booze quiz
 
Object oriented programming With C#
Object oriented programming With C#Object oriented programming With C#
Object oriented programming With C#
 
Unico Residential HVAC System Installation Guide
Unico Residential HVAC System Installation Guide Unico Residential HVAC System Installation Guide
Unico Residential HVAC System Installation Guide
 
Quiz 1.0
Quiz 1.0Quiz 1.0
Quiz 1.0
 
Tech quiz 1.0
Tech quiz 1.0Tech quiz 1.0
Tech quiz 1.0
 

Similar to How to Use and Maintain Your Air Purifier

Ръководство Xiaomi Mi Roborock 2
Ръководство Xiaomi Mi Roborock 2Ръководство Xiaomi Mi Roborock 2
Ръководство Xiaomi Mi Roborock 2Domotics Bg
 
Jay 1 neutral user manuel
Jay 1 neutral user manuelJay 1 neutral user manuel
Jay 1 neutral user manuelJeroxxx
 
COV34636825_Owners_Manual_Non_WiFi_Rev.0_v0_English.pdf
COV34636825_Owners_Manual_Non_WiFi_Rev.0_v0_English.pdfCOV34636825_Owners_Manual_Non_WiFi_Rev.0_v0_English.pdf
COV34636825_Owners_Manual_Non_WiFi_Rev.0_v0_English.pdfUyenNguyen129868
 
Manual optibox panthera
Manual optibox pantheraManual optibox panthera
Manual optibox pantheralolletto
 
Kiv 202 d202 eng manual
Kiv 202 d202 eng manualKiv 202 d202 eng manual
Kiv 202 d202 eng manualEva Va
 
Vf s11 instruction manual
Vf s11 instruction manualVf s11 instruction manual
Vf s11 instruction manualToàn Huỳnh
 
John deere je75 21 inch walk-behind mower service repair manual
John deere je75 21 inch walk-behind mower service repair manualJohn deere je75 21 inch walk-behind mower service repair manual
John deere je75 21 inch walk-behind mower service repair manualfjjsekmsmmes
 
John deere jx85 21 inch walk-behind mower service repair manual
John deere jx85 21 inch walk-behind mower service repair manualJohn deere jx85 21 inch walk-behind mower service repair manual
John deere jx85 21 inch walk-behind mower service repair manualfjjskekdmmme
 
John deere ja62 21 inch walk-behind mower service repair manual
John deere ja62 21 inch walk-behind mower service repair manualJohn deere ja62 21 inch walk-behind mower service repair manual
John deere ja62 21 inch walk-behind mower service repair manualfjjskekdmmme
 
John deere je75 21 inch walk-behind mower service repair manual
John deere je75 21 inch walk-behind mower service repair manualJohn deere je75 21 inch walk-behind mower service repair manual
John deere je75 21 inch walk-behind mower service repair manualfjjskekdmmme
 
John deere jx75 21 inch walk-behind mower service repair manual
John deere jx75 21 inch walk-behind mower service repair manualJohn deere jx75 21 inch walk-behind mower service repair manual
John deere jx75 21 inch walk-behind mower service repair manualfjjsekmsmmes
 
John deere jx75 21 inch walk-behind mower service repair manual
John deere jx75 21 inch walk-behind mower service repair manualJohn deere jx75 21 inch walk-behind mower service repair manual
John deere jx75 21 inch walk-behind mower service repair manualfjjskekdmmme
 
John deere ja60 21 inch walk-behind mower service repair manual
John deere ja60 21 inch walk-behind mower service repair manualJohn deere ja60 21 inch walk-behind mower service repair manual
John deere ja60 21 inch walk-behind mower service repair manualfjsjekkmdmme
 
John deere ja65 21 inch walk-behind mower service repair manual
John deere ja65 21 inch walk-behind mower service repair manualJohn deere ja65 21 inch walk-behind mower service repair manual
John deere ja65 21 inch walk-behind mower service repair manualfjjskekdmmme
 

Similar to How to Use and Maintain Your Air Purifier (20)

Carrier inverter Split System
Carrier inverter Split System Carrier inverter Split System
Carrier inverter Split System
 
Carrier Split Room Air Conditioner
Carrier Split Room Air ConditionerCarrier Split Room Air Conditioner
Carrier Split Room Air Conditioner
 
Carrier High Static Ducted System
Carrier High Static Ducted SystemCarrier High Static Ducted System
Carrier High Static Ducted System
 
AV Mixer
AV MixerAV Mixer
AV Mixer
 
Ръководство Xiaomi Mi Roborock 2
Ръководство Xiaomi Mi Roborock 2Ръководство Xiaomi Mi Roborock 2
Ръководство Xiaomi Mi Roborock 2
 
Jet hand dryer mitsubushi catalog
 Jet hand dryer mitsubushi  catalog  Jet hand dryer mitsubushi  catalog
Jet hand dryer mitsubushi catalog
 
mp_c3004.pdf
mp_c3004.pdfmp_c3004.pdf
mp_c3004.pdf
 
Jay 1 neutral user manuel
Jay 1 neutral user manuelJay 1 neutral user manuel
Jay 1 neutral user manuel
 
COV34636825_Owners_Manual_Non_WiFi_Rev.0_v0_English.pdf
COV34636825_Owners_Manual_Non_WiFi_Rev.0_v0_English.pdfCOV34636825_Owners_Manual_Non_WiFi_Rev.0_v0_English.pdf
COV34636825_Owners_Manual_Non_WiFi_Rev.0_v0_English.pdf
 
Manual optibox panthera
Manual optibox pantheraManual optibox panthera
Manual optibox panthera
 
Kiv 202 d202 eng manual
Kiv 202 d202 eng manualKiv 202 d202 eng manual
Kiv 202 d202 eng manual
 
Vf s11 instruction manual
Vf s11 instruction manualVf s11 instruction manual
Vf s11 instruction manual
 
John deere je75 21 inch walk-behind mower service repair manual
John deere je75 21 inch walk-behind mower service repair manualJohn deere je75 21 inch walk-behind mower service repair manual
John deere je75 21 inch walk-behind mower service repair manual
 
John deere jx85 21 inch walk-behind mower service repair manual
John deere jx85 21 inch walk-behind mower service repair manualJohn deere jx85 21 inch walk-behind mower service repair manual
John deere jx85 21 inch walk-behind mower service repair manual
 
John deere ja62 21 inch walk-behind mower service repair manual
John deere ja62 21 inch walk-behind mower service repair manualJohn deere ja62 21 inch walk-behind mower service repair manual
John deere ja62 21 inch walk-behind mower service repair manual
 
John deere je75 21 inch walk-behind mower service repair manual
John deere je75 21 inch walk-behind mower service repair manualJohn deere je75 21 inch walk-behind mower service repair manual
John deere je75 21 inch walk-behind mower service repair manual
 
John deere jx75 21 inch walk-behind mower service repair manual
John deere jx75 21 inch walk-behind mower service repair manualJohn deere jx75 21 inch walk-behind mower service repair manual
John deere jx75 21 inch walk-behind mower service repair manual
 
John deere jx75 21 inch walk-behind mower service repair manual
John deere jx75 21 inch walk-behind mower service repair manualJohn deere jx75 21 inch walk-behind mower service repair manual
John deere jx75 21 inch walk-behind mower service repair manual
 
John deere ja60 21 inch walk-behind mower service repair manual
John deere ja60 21 inch walk-behind mower service repair manualJohn deere ja60 21 inch walk-behind mower service repair manual
John deere ja60 21 inch walk-behind mower service repair manual
 
John deere ja65 21 inch walk-behind mower service repair manual
John deere ja65 21 inch walk-behind mower service repair manualJohn deere ja65 21 inch walk-behind mower service repair manual
John deere ja65 21 inch walk-behind mower service repair manual
 

More from UniqueIndoorComfortLibertyville

Small Duct Heating and Air Conditioning Company Unico Fact Sheet
Small Duct Heating and Air Conditioning Company Unico Fact SheetSmall Duct Heating and Air Conditioning Company Unico Fact Sheet
Small Duct Heating and Air Conditioning Company Unico Fact SheetUniqueIndoorComfortLibertyville
 
Indoor and Outdoor Heating Cooling Systems from Mitsubishi Carried by Unique ...
Indoor and Outdoor Heating Cooling Systems from Mitsubishi Carried by Unique ...Indoor and Outdoor Heating Cooling Systems from Mitsubishi Carried by Unique ...
Indoor and Outdoor Heating Cooling Systems from Mitsubishi Carried by Unique ...UniqueIndoorComfortLibertyville
 
Refrigerant Flow Zone Heating and Cooling System Catalog
Refrigerant Flow Zone Heating and Cooling System CatalogRefrigerant Flow Zone Heating and Cooling System Catalog
Refrigerant Flow Zone Heating and Cooling System CatalogUniqueIndoorComfortLibertyville
 
LEED for Home by Unico Available at Unique Indoor comfort Libertyville
LEED for Home by Unico Available at Unique Indoor comfort LibertyvilleLEED for Home by Unico Available at Unique Indoor comfort Libertyville
LEED for Home by Unico Available at Unique Indoor comfort LibertyvilleUniqueIndoorComfortLibertyville
 
Unico LEED and HVAC Sustainable Building Heating and Cooling
Unico LEED and HVAC Sustainable Building Heating and CoolingUnico LEED and HVAC Sustainable Building Heating and Cooling
Unico LEED and HVAC Sustainable Building Heating and CoolingUniqueIndoorComfortLibertyville
 
Unico HVAC Design Solutions Installed by Unique Indoor Comfort Libertyville
Unico HVAC Design Solutions Installed by Unique Indoor Comfort LibertyvilleUnico HVAC Design Solutions Installed by Unique Indoor Comfort Libertyville
Unico HVAC Design Solutions Installed by Unique Indoor Comfort LibertyvilleUniqueIndoorComfortLibertyville
 
Unico Small Duct Air Handler Replacement Guide Carried by Unique Indoor Comfo...
Unico Small Duct Air Handler Replacement Guide Carried by Unique Indoor Comfo...Unico Small Duct Air Handler Replacement Guide Carried by Unique Indoor Comfo...
Unico Small Duct Air Handler Replacement Guide Carried by Unique Indoor Comfo...UniqueIndoorComfortLibertyville
 
P-Series Commercial Ductless and Ducted Cooling Systems Catalog Available fro...
P-Series Commercial Ductless and Ducted Cooling Systems Catalog Available fro...P-Series Commercial Ductless and Ducted Cooling Systems Catalog Available fro...
P-Series Commercial Ductless and Ducted Cooling Systems Catalog Available fro...UniqueIndoorComfortLibertyville
 
Air Cleaning System Dynamic V8 for HVAC Systems Carried by Unique Indoor Comf...
Air Cleaning System Dynamic V8 for HVAC Systems Carried by Unique Indoor Comf...Air Cleaning System Dynamic V8 for HVAC Systems Carried by Unique Indoor Comf...
Air Cleaning System Dynamic V8 for HVAC Systems Carried by Unique Indoor Comf...UniqueIndoorComfortLibertyville
 

More from UniqueIndoorComfortLibertyville (14)

Small Duct Heating and Air Conditioning Company Unico Fact Sheet
Small Duct Heating and Air Conditioning Company Unico Fact SheetSmall Duct Heating and Air Conditioning Company Unico Fact Sheet
Small Duct Heating and Air Conditioning Company Unico Fact Sheet
 
Indoor and Outdoor Heating Cooling Systems from Mitsubishi Carried by Unique ...
Indoor and Outdoor Heating Cooling Systems from Mitsubishi Carried by Unique ...Indoor and Outdoor Heating Cooling Systems from Mitsubishi Carried by Unique ...
Indoor and Outdoor Heating Cooling Systems from Mitsubishi Carried by Unique ...
 
Refrigerant Flow Zone Heating and Cooling System Catalog
Refrigerant Flow Zone Heating and Cooling System CatalogRefrigerant Flow Zone Heating and Cooling System Catalog
Refrigerant Flow Zone Heating and Cooling System Catalog
 
LEED for Home by Unico Available at Unique Indoor comfort Libertyville
LEED for Home by Unico Available at Unique Indoor comfort LibertyvilleLEED for Home by Unico Available at Unique Indoor comfort Libertyville
LEED for Home by Unico Available at Unique Indoor comfort Libertyville
 
Unico Residential HVAC System Installation Guide
Unico Residential HVAC System Installation Guide Unico Residential HVAC System Installation Guide
Unico Residential HVAC System Installation Guide
 
Unico LEED and HVAC Sustainable Building Heating and Cooling
Unico LEED and HVAC Sustainable Building Heating and CoolingUnico LEED and HVAC Sustainable Building Heating and Cooling
Unico LEED and HVAC Sustainable Building Heating and Cooling
 
Unico System for Commercial HVAC Promotional Flyer
Unico System for Commercial HVAC Promotional FlyerUnico System for Commercial HVAC Promotional Flyer
Unico System for Commercial HVAC Promotional Flyer
 
Unico HVAC Design Solutions Installed by Unique Indoor Comfort Libertyville
Unico HVAC Design Solutions Installed by Unique Indoor Comfort LibertyvilleUnico HVAC Design Solutions Installed by Unique Indoor Comfort Libertyville
Unico HVAC Design Solutions Installed by Unique Indoor Comfort Libertyville
 
Unico Small Duct Air Handler Replacement Guide Carried by Unique Indoor Comfo...
Unico Small Duct Air Handler Replacement Guide Carried by Unique Indoor Comfo...Unico Small Duct Air Handler Replacement Guide Carried by Unique Indoor Comfo...
Unico Small Duct Air Handler Replacement Guide Carried by Unique Indoor Comfo...
 
MEUS 2013 HVAC Tax Credit Certification
MEUS 2013 HVAC Tax Credit Certification MEUS 2013 HVAC Tax Credit Certification
MEUS 2013 HVAC Tax Credit Certification
 
MSZ-FH Hyper-Heating INVERTER Residential Heating Pump
MSZ-FH Hyper-Heating INVERTER Residential Heating PumpMSZ-FH Hyper-Heating INVERTER Residential Heating Pump
MSZ-FH Hyper-Heating INVERTER Residential Heating Pump
 
P-Series Commercial Ductless and Ducted Cooling Systems Catalog Available fro...
P-Series Commercial Ductless and Ducted Cooling Systems Catalog Available fro...P-Series Commercial Ductless and Ducted Cooling Systems Catalog Available fro...
P-Series Commercial Ductless and Ducted Cooling Systems Catalog Available fro...
 
Air Cleaning System Dynamic V8 for HVAC Systems Carried by Unique Indoor Comf...
Air Cleaning System Dynamic V8 for HVAC Systems Carried by Unique Indoor Comf...Air Cleaning System Dynamic V8 for HVAC Systems Carried by Unique Indoor Comf...
Air Cleaning System Dynamic V8 for HVAC Systems Carried by Unique Indoor Comf...
 
Catch hold kill
Catch hold killCatch hold kill
Catch hold kill
 

Recently uploaded

Call Now ☎9870417354|| Call Girls in Noida Sector 12 Escort Service Noida N.C.R.
Call Now ☎9870417354|| Call Girls in Noida Sector 12 Escort Service Noida N.C.R.Call Now ☎9870417354|| Call Girls in Noida Sector 12 Escort Service Noida N.C.R.
Call Now ☎9870417354|| Call Girls in Noida Sector 12 Escort Service Noida N.C.R.riyadelhic riyadelhic
 
Call Girls In Lahore || 03274100048 ||Lahore Call Girl Available 24/7
Call Girls In Lahore || 03274100048 ||Lahore Call Girl Available 24/7Call Girls In Lahore || 03274100048 ||Lahore Call Girl Available 24/7
Call Girls In Lahore || 03274100048 ||Lahore Call Girl Available 24/7Sana Rajpoot
 
Call Now HIgh profile ☎9870417354|| Call Girls in Ghaziabad Escort Service De...
Call Now HIgh profile ☎9870417354|| Call Girls in Ghaziabad Escort Service De...Call Now HIgh profile ☎9870417354|| Call Girls in Ghaziabad Escort Service De...
Call Now HIgh profile ☎9870417354|| Call Girls in Ghaziabad Escort Service De...riyadelhic riyadelhic
 
9999266834 Call Girls In Noida Sector 18 (Delhi) Call Girl Service
9999266834 Call Girls In Noida Sector 18 (Delhi) Call Girl Service9999266834 Call Girls In Noida Sector 18 (Delhi) Call Girl Service
9999266834 Call Girls In Noida Sector 18 (Delhi) Call Girl Servicenishacall1
 
Rajkot Call Girls Contact Number +919358341802 Call Girls In Rajkot
Rajkot Call Girls Contact Number +919358341802 Call Girls In RajkotRajkot Call Girls Contact Number +919358341802 Call Girls In Rajkot
Rajkot Call Girls Contact Number +919358341802 Call Girls In RajkotSivanyaPandeya
 
Hire 💕 8617370543 Uttara Kannada Call Girls Service Call Girls Agency
Hire 💕 8617370543 Uttara Kannada Call Girls Service Call Girls AgencyHire 💕 8617370543 Uttara Kannada Call Girls Service Call Girls Agency
Hire 💕 8617370543 Uttara Kannada Call Girls Service Call Girls AgencyJia Oberoi
 
Lucknow ❣️ Call Girl 97487*63073 Call Girls in Lucknow Escort service book now
Lucknow ❣️  Call Girl 97487*63073 Call Girls in Lucknow Escort service book nowLucknow ❣️  Call Girl 97487*63073 Call Girls in Lucknow Escort service book now
Lucknow ❣️ Call Girl 97487*63073 Call Girls in Lucknow Escort service book nowapshanarani255
 
Call Now ☎9870417354|| Call Girls in Noida Sector 18 Escort Service Noida N.C.R.
Call Now ☎9870417354|| Call Girls in Noida Sector 18 Escort Service Noida N.C.R.Call Now ☎9870417354|| Call Girls in Noida Sector 18 Escort Service Noida N.C.R.
Call Now ☎9870417354|| Call Girls in Noida Sector 18 Escort Service Noida N.C.R.riyadelhic riyadelhic
 
Call Girls in Rawalpindi | 🍆💦 03280288848
Call Girls in Rawalpindi | 🍆💦 03280288848Call Girls in Rawalpindi | 🍆💦 03280288848
Call Girls in Rawalpindi | 🍆💦 03280288848Ifra Zohaib
 
RAJKOT CALL GIRLS 92628/71154 RAJKOT CAL
RAJKOT CALL GIRLS 92628/71154 RAJKOT CALRAJKOT CALL GIRLS 92628/71154 RAJKOT CAL
RAJKOT CALL GIRLS 92628/71154 RAJKOT CALNiteshKumar82226
 
Call Girls in Karachi || 03274100048 || 50+ Hot Sexy Girls Available 24/7
Call Girls in Karachi || 03274100048 || 50+ Hot Sexy Girls Available 24/7Call Girls in Karachi || 03274100048 || 50+ Hot Sexy Girls Available 24/7
Call Girls in Karachi || 03274100048 || 50+ Hot Sexy Girls Available 24/7Sana Rajpoot
 
JAMNAGAR CALL GIRLS 92628/71154 JAMNAGAR
JAMNAGAR CALL GIRLS 92628/71154 JAMNAGARJAMNAGAR CALL GIRLS 92628/71154 JAMNAGAR
JAMNAGAR CALL GIRLS 92628/71154 JAMNAGARNiteshKumar82226
 
Call Girls in Saket (delhi) call me [8264348440 ] escort service 24X7
Call Girls in Saket (delhi) call me [8264348440 ] escort service 24X7Call Girls in Saket (delhi) call me [8264348440 ] escort service 24X7
Call Girls in Saket (delhi) call me [8264348440 ] escort service 24X7soniya singh
 
Book_ A Project based approach CHAPTER 1 summary.pptx
Book_ A Project based approach CHAPTER 1 summary.pptxBook_ A Project based approach CHAPTER 1 summary.pptx
Book_ A Project based approach CHAPTER 1 summary.pptxssuser8fd809
 
Call Girls in Luxus Grand Hotel | 💋 03274100048
Call Girls in Luxus Grand Hotel | 💋 03274100048Call Girls in Luxus Grand Hotel | 💋 03274100048
Call Girls in Luxus Grand Hotel | 💋 03274100048Ifra Zohaib
 
Call Girls In {{Laxmi Nagar Delhi}} 9667938988 Indian Russian High Profile Es...
Call Girls In {{Laxmi Nagar Delhi}} 9667938988 Indian Russian High Profile Es...Call Girls In {{Laxmi Nagar Delhi}} 9667938988 Indian Russian High Profile Es...
Call Girls In {{Laxmi Nagar Delhi}} 9667938988 Indian Russian High Profile Es...aakahthapa70
 
Indore ❣️Call Girl 97487*63073 Call Girls in Indore Escort service book now
Indore  ❣️Call Girl 97487*63073 Call Girls in Indore Escort service book nowIndore  ❣️Call Girl 97487*63073 Call Girls in Indore Escort service book now
Indore ❣️Call Girl 97487*63073 Call Girls in Indore Escort service book nowapshanarani255
 
9999266834 Call Girls In Noida Sector 37 (Delhi) Call Girl Service
9999266834 Call Girls In Noida Sector 37 (Delhi) Call Girl Service9999266834 Call Girls In Noida Sector 37 (Delhi) Call Girl Service
9999266834 Call Girls In Noida Sector 37 (Delhi) Call Girl Servicenishacall1
 
9891550660 Call Girls In Noida Sector 62 Short 1500 Night 6000
9891550660 Call Girls In Noida Sector 62 Short 1500 Night 60009891550660 Call Girls In Noida Sector 62 Short 1500 Night 6000
9891550660 Call Girls In Noida Sector 62 Short 1500 Night 6000teencall080
 
VAPI CALL GIRL 92628/71154 VAPI CALL GIR
VAPI CALL GIRL 92628/71154 VAPI CALL GIRVAPI CALL GIRL 92628/71154 VAPI CALL GIR
VAPI CALL GIRL 92628/71154 VAPI CALL GIRNiteshKumar82226
 

Recently uploaded (20)

Call Now ☎9870417354|| Call Girls in Noida Sector 12 Escort Service Noida N.C.R.
Call Now ☎9870417354|| Call Girls in Noida Sector 12 Escort Service Noida N.C.R.Call Now ☎9870417354|| Call Girls in Noida Sector 12 Escort Service Noida N.C.R.
Call Now ☎9870417354|| Call Girls in Noida Sector 12 Escort Service Noida N.C.R.
 
Call Girls In Lahore || 03274100048 ||Lahore Call Girl Available 24/7
Call Girls In Lahore || 03274100048 ||Lahore Call Girl Available 24/7Call Girls In Lahore || 03274100048 ||Lahore Call Girl Available 24/7
Call Girls In Lahore || 03274100048 ||Lahore Call Girl Available 24/7
 
Call Now HIgh profile ☎9870417354|| Call Girls in Ghaziabad Escort Service De...
Call Now HIgh profile ☎9870417354|| Call Girls in Ghaziabad Escort Service De...Call Now HIgh profile ☎9870417354|| Call Girls in Ghaziabad Escort Service De...
Call Now HIgh profile ☎9870417354|| Call Girls in Ghaziabad Escort Service De...
 
9999266834 Call Girls In Noida Sector 18 (Delhi) Call Girl Service
9999266834 Call Girls In Noida Sector 18 (Delhi) Call Girl Service9999266834 Call Girls In Noida Sector 18 (Delhi) Call Girl Service
9999266834 Call Girls In Noida Sector 18 (Delhi) Call Girl Service
 
Rajkot Call Girls Contact Number +919358341802 Call Girls In Rajkot
Rajkot Call Girls Contact Number +919358341802 Call Girls In RajkotRajkot Call Girls Contact Number +919358341802 Call Girls In Rajkot
Rajkot Call Girls Contact Number +919358341802 Call Girls In Rajkot
 
Hire 💕 8617370543 Uttara Kannada Call Girls Service Call Girls Agency
Hire 💕 8617370543 Uttara Kannada Call Girls Service Call Girls AgencyHire 💕 8617370543 Uttara Kannada Call Girls Service Call Girls Agency
Hire 💕 8617370543 Uttara Kannada Call Girls Service Call Girls Agency
 
Lucknow ❣️ Call Girl 97487*63073 Call Girls in Lucknow Escort service book now
Lucknow ❣️  Call Girl 97487*63073 Call Girls in Lucknow Escort service book nowLucknow ❣️  Call Girl 97487*63073 Call Girls in Lucknow Escort service book now
Lucknow ❣️ Call Girl 97487*63073 Call Girls in Lucknow Escort service book now
 
Call Now ☎9870417354|| Call Girls in Noida Sector 18 Escort Service Noida N.C.R.
Call Now ☎9870417354|| Call Girls in Noida Sector 18 Escort Service Noida N.C.R.Call Now ☎9870417354|| Call Girls in Noida Sector 18 Escort Service Noida N.C.R.
Call Now ☎9870417354|| Call Girls in Noida Sector 18 Escort Service Noida N.C.R.
 
Call Girls in Rawalpindi | 🍆💦 03280288848
Call Girls in Rawalpindi | 🍆💦 03280288848Call Girls in Rawalpindi | 🍆💦 03280288848
Call Girls in Rawalpindi | 🍆💦 03280288848
 
RAJKOT CALL GIRLS 92628/71154 RAJKOT CAL
RAJKOT CALL GIRLS 92628/71154 RAJKOT CALRAJKOT CALL GIRLS 92628/71154 RAJKOT CAL
RAJKOT CALL GIRLS 92628/71154 RAJKOT CAL
 
Call Girls in Karachi || 03274100048 || 50+ Hot Sexy Girls Available 24/7
Call Girls in Karachi || 03274100048 || 50+ Hot Sexy Girls Available 24/7Call Girls in Karachi || 03274100048 || 50+ Hot Sexy Girls Available 24/7
Call Girls in Karachi || 03274100048 || 50+ Hot Sexy Girls Available 24/7
 
JAMNAGAR CALL GIRLS 92628/71154 JAMNAGAR
JAMNAGAR CALL GIRLS 92628/71154 JAMNAGARJAMNAGAR CALL GIRLS 92628/71154 JAMNAGAR
JAMNAGAR CALL GIRLS 92628/71154 JAMNAGAR
 
Call Girls in Saket (delhi) call me [8264348440 ] escort service 24X7
Call Girls in Saket (delhi) call me [8264348440 ] escort service 24X7Call Girls in Saket (delhi) call me [8264348440 ] escort service 24X7
Call Girls in Saket (delhi) call me [8264348440 ] escort service 24X7
 
Book_ A Project based approach CHAPTER 1 summary.pptx
Book_ A Project based approach CHAPTER 1 summary.pptxBook_ A Project based approach CHAPTER 1 summary.pptx
Book_ A Project based approach CHAPTER 1 summary.pptx
 
Call Girls in Luxus Grand Hotel | 💋 03274100048
Call Girls in Luxus Grand Hotel | 💋 03274100048Call Girls in Luxus Grand Hotel | 💋 03274100048
Call Girls in Luxus Grand Hotel | 💋 03274100048
 
Call Girls In {{Laxmi Nagar Delhi}} 9667938988 Indian Russian High Profile Es...
Call Girls In {{Laxmi Nagar Delhi}} 9667938988 Indian Russian High Profile Es...Call Girls In {{Laxmi Nagar Delhi}} 9667938988 Indian Russian High Profile Es...
Call Girls In {{Laxmi Nagar Delhi}} 9667938988 Indian Russian High Profile Es...
 
Indore ❣️Call Girl 97487*63073 Call Girls in Indore Escort service book now
Indore  ❣️Call Girl 97487*63073 Call Girls in Indore Escort service book nowIndore  ❣️Call Girl 97487*63073 Call Girls in Indore Escort service book now
Indore ❣️Call Girl 97487*63073 Call Girls in Indore Escort service book now
 
9999266834 Call Girls In Noida Sector 37 (Delhi) Call Girl Service
9999266834 Call Girls In Noida Sector 37 (Delhi) Call Girl Service9999266834 Call Girls In Noida Sector 37 (Delhi) Call Girl Service
9999266834 Call Girls In Noida Sector 37 (Delhi) Call Girl Service
 
9891550660 Call Girls In Noida Sector 62 Short 1500 Night 6000
9891550660 Call Girls In Noida Sector 62 Short 1500 Night 60009891550660 Call Girls In Noida Sector 62 Short 1500 Night 6000
9891550660 Call Girls In Noida Sector 62 Short 1500 Night 6000
 
VAPI CALL GIRL 92628/71154 VAPI CALL GIR
VAPI CALL GIRL 92628/71154 VAPI CALL GIRVAPI CALL GIRL 92628/71154 VAPI CALL GIR
VAPI CALL GIRL 92628/71154 VAPI CALL GIR
 

How to Use and Maintain Your Air Purifier

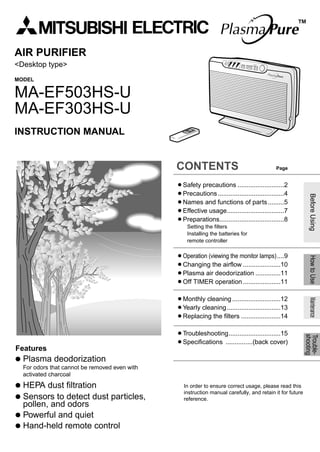
  • 1. Before Using How to Use Maintenance Trouble-shooting AIR PURIFIER <Desktop type> MODEL MA-EF503HS-U MA-EF303HS-U INSTRUCTION MANUAL Features Plasma deodorization For odors that cannot be removed even with activated charcoal HEPA dust filtration Sensors to detect dust particles, pollen, and odors Powerful and quiet Hand-held remote control CONTENTS Page ¡Safety precautions ..........................2 ¡Precautions .....................................4 ¡Names and functions of parts .........5 ¡Effective usage................................7 ¡Preparations....................................8 Setting the filters Installing the batteries for remote controller ¡Operation (viewing the monitor lamps)....9 ¡Changing the airflow .....................10 ¡Plasma air deodorization ..............11 ¡Off TIMER operation .....................11 ¡Monthly cleaning ...........................12 ¡Yearly cleaning..............................13 ¡Replacing the filters ......................14 ¡Troubleshooting.............................15 ¡Specifications ...............(back cover) ™ In order to ensure correct usage, please read this instruction manual carefully, and retain it for future reference.
  • 2. Safety precautions The following displays categorize the degree of danger when mishandled. WARNING CAUTION Possibility of serious injury and even death, if mishandled. Possibility of injury and damage to household furniture and surroundings. Do not repair, disassemble or modify. AC120V WARNING The following symbols are defined as follows: Prohibited Do not touch Do not use Do not near water disassemble Do not get wet Always follow Remove the power plug Fire and/or electrical shock may occur as a result. For repair, contact your dealer of purchase or Mitsubishi Electric. Do not damage the power cord. Do not coat or bundle. Do not place objects on top of the cord. Do not remove the power plug by pulling on the cord. Fire, electrical shock, and/or damage may occur as a result. Do not use damaged power cord or plug. Do not use damaged power outlet where the plug cannot be inserted securely. Electrical shock, short circuit and/or fire may occur as a result. Do not wash the Plasma unit. Using the Plasma unit when wet may cause fire and/or electrical shock. Do not insert finger or foreign objects into the dust sensor. Electrical shock may occur as a result. Remove the power plug when cleaning. Furthermore, never handle the power plug with wet hands or get the plug wet. Electrical shock and/or injury may occur as a result. Use an AC120V power outlet. Electrical shock, short circuit and/or fire may occur as a result. Periodically remove dust from the power plug with a dry cloth. Dust build-up can cause bad insulation and a fire may occur as a result. 2 To reduce the risk of electric shock, this equipment has a polarized plug (one blade is wider than the other). This plug will fit in a polarized outlet only one way. If the plug does not fit fully in the outlet, reverse the plug. If it still does not fit, contact qualified personnel to install the proper outlet. Do not alter the plug in any way.
  • 3. CAUTION Gas Gas Gas Oil Oil Oil Spray Before Using 3 Do not allow the unit to intake flammable gases. Do not use where there is accumulation of such flammable gases (factories, hair salons, etc.). Explosion and/or fire may occur as a result. Do not install in a location such as a bathroom where the unit may get wet, and avoid places with high humidity. Electrical shock and/or malfunction may occur as a result. If the unit gets wet for some reason, stop operation, remove the power plug and contact your dealer of purchase or Mitsubishi Electric Electronics USA, Inc.. Do not use in a location where there is lampsmoke, such as from machine oil, etc. The unit may crack, resulting in electrical shock and/or malfunction. Do not insert fingers or foreign objects into the intake grill, the exhaust air port, or any small openings of the unit interior. Electrical shock, malfunction and/or injury may occur as a result. Do not wipe with benzene or paint thinner, and do not spray insecticides or deodorizers, etc., onto the unit. Electrical shock, fire and/or cracking may occur as a result. Do not remove the HEPA filter with the unit laying on its back. Dust may enter inside the unit, and fire and/or electrical shock may occur as a result. Do not use damaged filters, or operate the unit without a filter. Contact your dealer or Mitsubishi Electric for a replacement. Fire and/or electrical shock may occur as a result. Do not touch the electric poles of the Plasma unit. Injury may occur as a result. Ventilate periodically when using the unit with a heating appliance, etc. Insufficient ventilation may cause CO intoxication. Do not use rechargeable batteries. Make sure that the and are correctly aligned. When replacing, always replace batteries at the same time using the same type. If the electrolyte from the alkaline batteries comes into contact with skin, wash thoroughly with water. If the electrolyte accidentally enters your eye, flush with water and seek immediate medical attention. Remove the power plug when not using for an extended period of time. Insulation may deteriorate, causing short circuit, fire and/or electrical shock as a result. Use the batteries correctly by following the items below. Injury and/or malfunction may occur if mishandled. Safety precautions
  • 4. 4 Precautions This air purifier is for household use only. Do not use for business purposes. Do not block the intake grill or the exhaust air ports. Malfunction may occur as a result. Do not use if the unit is laying on its back or front. Malfunction may occur as a result. Do not use with the intake grill, the filters or the Plasma unit removed. Malfunction may occur as a result. Do not use the unit as a ventilation fan or range hood. This may drastically reduce the service life of the filter as well as cause deformation, discoloration and/or malfunction. If the remote controller comes into contact with a liquid, remove batteries and dry thoroughly. If the remote controller becomes inoperable, contact your dealer of purchase or Mitsubishi Electric. Take note of the following when installing the unit Do not install near or on top of hot objects, such as a stove, etc. Malfunction, deformation and/or discoloration may occur as a result. Keep unit at least 3.3 feet (1m) away from televisions, cordless telephones, air conditioners, computers, incandescent bulbs, fluorescent lighting, etc. Electrical wave interference may occur, resulting in the remote control becoming inoperable. Do not use in a location exposed to direct sunlight Deformation and/or discoloration may occur as a result. Leave space around the unit 2 feet (60 cm) or more above the unit and 0.7 feet (20 cm) or more on the sides and back. 2 feet (60 cm) 0.7 feet or more (20 cm) or more 0.7 feet (20 cm) or more 0.7 feet (20 cm) or more Walls and/or ceiling may become dirty as a result. When carrying Turn the power switch to OFF, unplug the unit, and carry the unit by the handle. Do not press strongly against the control panel when carrying. Notes How strong are the electromagnetic waves discharged by this air purifier? The electromagnetic waves produced by this product are lower than mobile phones, and are harmless to the body and medical equipment. Can the unit remove odors of newly constructed houses? The unit may not be able to completely remove odors if the discharge of odors is too much such as with new paint or carpet glues.
  • 5. Main unit Accessories Control panel Table stand Grill-release button Press to remove the grill. (On each side of unit) 6~7 Before Using 5 Names and functions of parts Odor sensor Detects smell of cigarettes, etc. Reset Switch Press after replacing the filter. Activated charcoal filter Remote controller Two AA type batteries for the remote controller Plasma unit HEPA filter Intake grill Dust sensor Detects polluted air such as pollen, etc. Air fan Spring clips (On each side of Plasma unit) What is a HEPA filter? High Efficiency Particulate Air filter The HEPA filter is a high performance filter than can catch up to 99.97% of all particles as small as 0.3 micron in diameter. Handle Exhaust air port Power cord Removing Lay the unit on its back side, and then remove the stand by pressing table stand tabs. Replacing Hook the tabs on the front side of the table stand, and then press in the rear side of the stand. Precautions Names and functions of parts 6~7 Removing and replacing the unit table stand
  • 6. PLASMA REPLACE FILTER Control panel Plasma deodorization lamp ON… Plasma deodorization in process Flashing…Error 13 Remote sensor How to use the remote controller 9 Odor sensor Filter replacement lamp When lit, it indicates that the filters should be replaced. 14 Plasma air deodorization 11 ODOR MICRO DUST POLLEN Viewing the monitor lamps 9 Odor monitor (odor sensor) Shows the level of air pollution caused by odor of cigarette smoke, etc. Microdust Monitor (dust sensor) Displays the level of air pollution caused by tiny particles such as cigarette smoke, etc. Pollen Monitor (dust sensor) Displays the level of air pollution caused by large particles such as pollen, dead mites, dust, etc. Dusts which are harmful to the lungs Small particles of cigarette smoke How do the sensors work? Odor sensor Using a semiconductor sensor, gases from odor ingredients are detected. The sensor will react to a breeze from air conditioners, fans, etc., as well as odorless gases and perfumes. Feces or dead body of mites, dust Pollen Dust sensor ¡MICRODUST Using an optical sensor, the number of particles less than approximately 1 micron is detected. ¡POLLEN Using an optical sensor, the number of particles more than approximately 1 micron is detected. About microdust and pollen 0.01 0.1 1 10 100 (micron) MICRODUST Small particles such cigarette smoke, etc. (Mainly particles smaller than 1 micron) POLLEN Large particles such as pollen, dead mites, etc. (Mainly particles of larger than 1 micron) Replacing the filters 6 Names and functions of parts (continued)
  • 7. Before Using 7 AUTO FAN PLASMA TIMER Plasma air deodorization switch (on the remote only) ¡Plasma air deodorization function ON ¡Plasma air deodorization function OFF NORMAL Operation mode button 10 ¡Switches operation modes. POLLEN HOUR MIN LOW MED HIGH MAX GUARD TIMER FAN AUTO POWER POWER ON/OFF 11 10 10 15 15 Off TIMER operation Off TIMER lamps Show the remaining operation time (hours). Off TIMER button ¡Switches the timer ON ¡Switches the timer OFF Changing the airflow FAN level indicator ON: The fan level in operation is displayed. Flashing: Error FAN button ¡Switches operation modes and airflow volume Changing the airflow Operation 9 POWER button ¡Turns the unit ON ¡Turns the unit OFF Operation mode lamps POLLEN GUARD lamp ON: Pollen guard in progress NORMAL lamp ON: Normal operation in progress Flashing: Error AUTO button Switches operation modes Remote control operation panel 11 11 9 Operation switch ¡Turns the unit ON ¡Turns the unit OFF Off TIMER switch ¡Switches the timer ON ¡Switches the timer OFF Names and functions of parts Effective usage 10 Table-top POLLEN GUARD operation POLLEN GUARD, which reacts to even the slightest traces of pollen, is recommended. Since scattered dust and pollen fall gradually, install the unit in a low location for the best result. Running the unit all day is also recommended if you are concerned about pollen. Use by installing on a high platform Since cigarette smoke rises directly upward, installing the unit in a high location is recommended such as on a counter or dresser. (Take caution so that the unit does not fall.) Effective usage For the best results from your product, install the unit where there is good air circulation. If you are concerned about pollen If you are concerned about smoke
  • 8. 1 2 3 4 5 (White particles within the activated charcoal filter are titanium oxide, not mildew.) 12~13 + - + - 1 2 3 Ensure that the proper polarity is observed. Caution 8 Preparation Setting the filters Remove the plastics from the HEPA filter and the activated charcoal filter before use. Press the grill-release buttons, and then remove the intake grill. Both sides Remove the HEPA filter. Remove the plastic Remove the Plasma unit. Hold the spring clips, and remove one side at a time. Hold with both hands, and pull to remove. Install the activated charcoal filter. Remove the plastic before installing. Replace the Plasma unit, the HEPA filter, and the intake grill. Installing the batteries for the remote controller While pushing the cover, slide it forward. Insert the batteries. Two AA type batteries Close the cover by sliding it backward until it snaps shut. Use dry cell batteries in a proper manner. Do not use rechargeable batteries. Make sure that the positive and negative poles are correctly aligned. When replacing, always replace with two new batteries of the same type. Should your skin come in contact with the electrolyte of the alkaline dry cell batteries, wash the affected area with water. Should the electrolyte enter your eye, immediately contact a doctor. Wrong use may cause injury or malfunction.
  • 9. Preparation Operation Before Using 9 On the main unit Press the power button on the main unit to turn on the air purifier. NORMAL POLLEN Operation HOUR MIN LOW MED HIGH MAX GUARD TIMER FAN AUTO POWER ON/OFF ON OFF Press beep, beep POWER beep, beeep ON/OFF Using the remote controller Press the power button on the remote controller to turn on the air purifier. The operation is the same as on the main unit. POWER POWER AUTO FAN PLASMA TIMER Press Each time you press this button, the unit turns ON or OFF. Both the operation mode lamp and the monitor lamp must be ON. When you plug in the power cord, the monitor lamps blink for approximately two minutes while the sensors stabilize. ODOR MICRO DUST POLLEN How to use the remote controller The remote controller allows you to operate the unit from a remote place. Aim the remote controller toward the main unit and press the switch. The maximum range of operation is 23 feet (7 m). Remote sensor Remote controller Do not cover the remote sensor with cloths, etc. If the main unit does not respond properly to the signals from the remote controller, replace with the new batteries. Make sure the remote sensor and the remote controller are in sight of one another. Remote controller operation may not be possible in the following situations: In areas where the unit is subjected to direct sunlight. The infrared rays of the sunlight may effect the remote sensor on the unit In rooms with inverter lighting for lower power consumption. The noise from the inverter lighting may effect the remote sensor on the unit. Viewing the monitor lamps The lamps light up (four levels) depending on amount of air contaminants or odors present. FAN SPEED MAX Clean air Dirty air MIN How to Use
  • 10. You can select between FAN (manual) and AUTO operation modes. NORMAL POLLEN HOUR MIN LOW MED HIGH MAX GUARD TIMER FAN AUTO POWER ON/OFF FAN AUTO AUTO FAN MIN LOW MED HIGH MAX NORMAL POLLEN GUARD POWER AUTO FAN PLASMA TIMER beep beep beep 10 Changing the airflow On the main unit Using the remote controller You can select from 5 airflow volumes or AUTO. Press one of the buttons You can select the airflow volume from the remote controller. The operation is the same as with the main unit. Press one of the buttons FAN You can select from 5 airflow volumes. The airflow changes each time the button is pressed, and the lamp of the chosen volume lights up. AUTO You can select from POLLEN GUARD and NORMAL. Operation switches every time the button is pressed, and the selected operation mode lamp lights. Operation is automatically adjusted to the appropriate airflow volume according to the odor monitor, microdust monitor, and pollen monitor. MIN or LOW When sleeping HIGH or MAX When house cleaning POLLEN GUARD The sensor is set to supersensitive to react to even the slightest traces of pollen. The fan speed is faster than the NORMAL operation for easier intake of large particles such as pollen, etc. NORMAL The level of air pollution in the room is monitored using the odor and dust sensors, and the appropriate airflow volume is automatically selected. When the air is clean, the fan will stop. The unit will return to the previously set mode even after turning the unit off. The unit will return to the previously set mode even when reinserting the power plug or after having a power failure.
  • 11. beep beeep NORMAL POLLEN POWER HOUR MIN LOW MED HIGH MAX GUARD TIMER FAN AUTO POWER ON/OFF AUTO FAN PLASMA TIMER POWER AUTO FAN PLASMA TIMER PLASMA TIMER TIMER The remaining operation time can be changed. beeep beep beep beep Continuous HOUR Operation (Lamp off) How to Use 11 Plasma air deodorization The unit uses the odor sensor to monitor the level of air pollution, then automatically activates the Plasma to break up odor ingredients in the air. Using the remote controller You can turn the Plasma deodorization function ON or OFF. Each time you press this button, the Plasma unit turns ON or OFF. Turn the Plasma deodorization lamp ON. The unit will return to the previously set operation mode when power is interrupted. Since the unit operates intermittently during the Plasma deodorization, a hissing noise may be heard, and the unit may also stop at times. If the noise becomes irritating, turn off the feature by pressing the PLASMA button on the remote control. When the Plasma deodorization lamp is blinking, turn the unit off, and clean the Plasma unit. To operate from the main unit, you can turn the Plasma deodorization ON or OFF using the following procedure: When the power is turned on, press and hold the AUTO button, and press the POWER switch. Off TIMER operation On the main unit You can set the unit so that it turns off after running for a preset time. (1, 2, 4 hours) Using the remote controller You can also use the remote controller to set/deactivate the off TIMER. The operation is the same as on the main unit. The selected Off TIMER lamp lights. The Off TIMER lamp will display the remaining operation time and will switch as time passes. Changing the airflow Plasma air deodorization/Off timer operation ON OFF Press Press Press 13
  • 12. Cleaning Sensors, the HEPA filter, and main unit Cleaning the Plasma unit Cleaning the sensors Cleaning the HEPA filter 1 2 3 4 14 remove dust by taking care not to tear the HEPA filter surface. Do not wash. The filter cannot be reused if washed or after becoming wet. Direction of airflow 12 Maintenance Monthly cleaning For the best performance from your unit, clean approximately once a month. Both sides Using the soft nozzle brush of a vacuum cleaner, Odor sensor (control panel) Remove dust using the nozzle of a vacuum cleaner. Remove surrounding dust using the nozzle brush of a vacuum cleaner. Dust sensor surroundings Cleaning the main unit Intake grill Remove dust using a nozzle brush of a vacuum cleaner. For stubborn dirt, remove the intake grill, and wash with a soft sponge. Thoroughly dry before replacing. Main unit Dry-wipe with a soft cloth. For stubborn dirt, wipe with a cloth dampened with water. Press the grill release buttons on each side, and remove the intake grill. Remove the HEPA filter and clean. Replace the HEPA filter. 8 Replace the HEPA filter with the logo facing you and arrows pointing away from you. Replace the intake grill. Hook the five tabs on the upper side of the intake grill, and press in the lower side until the release buttons snap securely. Monthly Yearly Replacing the filters WARNING Before cleaning the unit, turn off the power and remove the power plug. Electrical shock and/or injury may occur as a result.
  • 13. 1 2 3 4 5 1 2 3 Maintenance 13 WARNING Before cleaning the unit, turn off the power and remove the power plug. Electrical shock and/or injury may occur as a result. Yearly cleaning Clean at least once a year. Clean the Plasma unit if the Plasma deodorization lamp flashes. Cleaning the dust sensor Remove the cover by depressing the cover spring. Left side of main unit Clean the sensor lenses. Use a dry cotton swab and clean the two lenses. Replace the cover. Cleaning the Plasma unit Press the grill release buttons on each side; remove the intake grill, and then remove the HEPA filter. Remove the Plasma unit. Hold the spring clips, and remove one side at a time. Pull the Plasma unit towards you to remove. Plasma unit Do not pull by force. Malfunction may occur as a result. Clean the Plasma unit. Use a toothbrush, and lightly flick off the tips of the electric poles. Lightly flick off the tips. Using force may cause the Plasma unit to deform, resulting in malfunction of the unit. Replace the Plasma unit. Position the Plasma unit using both hands, and press in each spring clip until you hear a click. Push in the lower section. Replace the HEPA filter and the intake grill. Monthly cleaning Yearly cleaning 8
  • 14. Color of cigarette ingredients REPLACE FILTERS Available from Mitsubishi Electric www.plasmapure.com Please replace the HEPA filter and the activated charcoal filter with new filters when the color on the surface of the HEPA filter matches the color indicated above. Reset Switch 1 2 3 4 5 6 Reset switch Set vertically. (There is no front or back.) Beep 14 Use a ball point pen, or a similar pointed object, and press until a beep is heard. Maintenance (continued) Replacing the filters The filter replacement lamp notifies you of the replacement period of the HEPA filter and the activated charcoal filter. Replace both the HEPA filter and the activated charcoal filter at the same time. Replacement period Color of household dust The service life of the filters varies depending on the usage environment, and conditions. The HEPA filter and the activated charcoal filter cannot be reused. Always replace old filters with new filters. When smoking large amount of cigarettes, odor may adhere to the filter and main unit. In this case, clean the main unit, and replace the filters. Separately sold part: Replacement filter set (HEPA filter/activated charcoal filter) Model MAPR-E837HFT Code no. 5D4 C06 To order parts, contact your dealer of purchase or Mitsubishi Electric @ www.plasmapure.com Remove the intake grill and the HEPA filter. Remove the Plasma unit. Replace the activated charcoal filter. Replace the Plasma unit and mount a new HEPA filter. Insert the power plug and press the Reset Switch. Replace the intake grill. 12~13 Although the replacement period depends on the usage environment and conditions, the lamp will light after approximately 5 years when using the unit on constant MIN fan speed. (In the case of MAX, the lamp will light in approximately 1/4 the time.) When the filter replacement lamp illuminates When the HEPA filter becomes dirty and the color is about the same as that indicated on the label
  • 15. Is the unit installed on an unstable or unlevel surface? Install on a level and stable surface. Reinsert the power plug into the power outlet. Press the power switch and turn on the power. Clean the sensors. Replace the HEPA filter and the activated charcoal filter. Clean the sensors. Replace the HEPA filter and the activated charcoal filter. Remove the plastic and replace. Reset the intake grill, the HEPA filter and the activated charcoal filter. Clean the Plasma unit. Replace with new batteries, or correctly set the batteries observing the proper polarity. 12~13 14 12~13 14 8 13 8 Symptom Cause Remedy Main unit vibrates heavily There is no air intake Little monitor response Odor and smoke are not completely removed Is the power plug securely inserted into the power outlet? Is the fan level lamp on? (Is the power on?) Are the sensors dusty? Is the HEPA filter or the activated charcoal filter dirty? Are the sensors dusty? Fan noise and vibration are louder than before One of the following lamps flash: FAN/POLLEN GUARD/NORMAL Plasma deodorization lamp flashes Is the HEPA filter or the activated charcoal filter dirty? Is the activated charcoal filter still wrapped in plastic? Are the intake grill, the HEPA filter and the activated charcoal filter properly set? There is an abnormal electrical discharge. The remote controller does not work Have the batteries been completely depleted or are the and of the batteries set correctly? The following symptoms are not malfunctions. Symptom Cause The air fan does not turn, or there is no air discharge A small hissing noise is heard, or there is a smell of ozone during the Plasma deodorization The monitors do not change much (Odor monitor, microdust monitor and pollen monitor) The odor monitor does not change even when an odor can be noticed Is the unit operating in AUTO (NORMAL) mode? The unit will stop operation when the air is clean. During the Plasma deodorization, you may hear a small hissing noise or notice an ozone smell. (The level of noise and degree of the smell of ozone will vary depending on the environment. The generated ozone is of low concentration and is harmless to the body.) Is the room too large? Use the unit within the range of the applicable floor area. Checking monitor operation: Rub tissue paper in front of the main unit to discharge dust. Blow cigarette smoke. If there is a large volume of dust or odor, it may take some time for the air to become clean. The sensitivity of the sensor differs depending on odor ingredients, and the monitor display may at times remain unchanged. The monitor lamp flashes The monitor lamp will flash until the sensors become stable, even if the power is turned on immediately after inserting the power plug. The monitor lamp flashes even when the room is clean The sensor may at times respond to a breeze from air conditioners within the room, and gases that are unnoticeable to the human smell. Should the problem persist after having checked the above list, stop using the unit, remove the power plug and contact your dealer of purchase or Mitsubishi Electric. Maintenance Trouble-shooting 15 Troubleshooting Replacing the filters Troubleshooting
  • 16. MA-EF303HS-U PPIMA11/00-04K T946Z023H01 00/11 Power consumption Airflow volume Room size Weight Dimension (H×W×D) Power cord length Safety devices Accessories MA-EF503HS-U AC120V 60Hz 233 Sq.FT 155 Sq.FT 13 ft × 18 ft 11 ft × 14 ft 17.1lbs (7.6 kg) 15-3/4 × 22-7/32 × 7-7/8 (400mm × 564mm × 200mm) 8.2 ft (2.5m) MAX HIGH MED LOW MIN MAX HIGH MED LOW MIN 36W 26W 19W 17W 16W 106 CFM 90 CFM 65 CFM 46 CFM 34 CFM 66W 28W 19W 17W 16W 160 CFM 102 CFM 65 CFM 46 CFM 34 CFM MITSUBISHI ELECTRIC AIR PURIFIER MA-EF503HS-U • MA-EF303HS-U Model Power supply Current fuse (2A), motor overheat protection device (operational temp: 212°F (100°C)), abnormal electric discharge protection device Remote controller (type AA battery × 2) Specifications For more information, visit www.plasmapure.com or call 1-866-475-2762