
Recommended
More Related Content
Similar to Otto Servo Calibration guide.pptx
Similar to Otto Servo Calibration guide.pptx (20)
Recently uploaded
Recently uploaded (20)
Otto Servo Calibration guide.pptx
- 3. ● Also called “centering” or “homing” ● It is in the hardware a “mechanical alignment” ● Most 180 degrees servo motors have the rotation mechanically limited ● Align the servos close to 90 degrees angle it is a requirement in Otto to be able to walk or dance. ● If Otto is falling is because of bad alignment in the servos, re- assemble again ● “to Increase accuracy” ● It is made with software, “electronic calibration” ● Calibration is ONLY required for precise movements like "straight walk" or standing in one leg. (is optional not required) ● In any case you MUST align servos as close as possible to the center before calibrating. (+- 6 degrees) Align Servos Calibrate Servos
- 4. Why is it not walking straight? If you have carefully followed the instructions on how to build Otto and have made sure that all the servos are aligned(set at 90 degrees) before you attach the arms good job you have a functional robot that you can use for dancing and interactions. Otto will move ok but not perfect. 😞 What happened? Why Otto doesn’t walk straight and doesn’t move smoothly in certain movements?
- 5. Otto needs adjustments Do not be disappointed and do not worry! This is completely normal and happens in every Otto or robot built. This is the stage where you need to adjust the central positions of the servos using a process called “calibration”. This will only need to be done once per robot and then the correct positions will be remembered every time you turn on your Otto.
- 7. Install
- 9. Proper Otto Calibration 1. Click the open icon and select the example file included in the folder, make sure your robot is connected to the usb and then click upload.
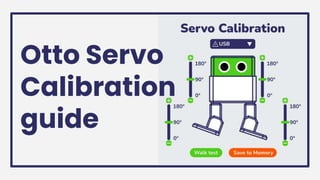
- 10. Servo Calibration 2. After successfully upload Unplug the USB connection. 3. Unzip and Run the app file according to your OS contained in its relevant folder. Leave the file in its folder - the program will not run if it does not have access to the data files.
- 11. Servo Calibration 4. Plug the USB again into Otto and the red cross should turn into a green tick when the program has recognised that the USB connection has been made. If you forgot to unplug the USB, you will need to close the program, unplug the USB and start the program again.
- 12. Servo Calibration 5. Now calibrate the servo positions so the the legs and feet are correctly aligned in the robot on your table. The slider allows for large changes in the angle and the + and - buttons much finer control on the position of each servo.
- 13. Servo Calibration 6. When the servos on Otto are correctly aligned, click on 'Walk Test' to see how Otto moves. If further fine adjustments are required, they should be done now and the walk test repeated. Be careful that the USB cable does not interfere with Otto's movement and do not disconnect.
- 14. Servo Calibration 7. Once you are happy with the calibration, click 'Save'. A tick and properly aligned Otto will appear on the interface. Your Otto will produce a happy sound (if you have connected the buzzer) and a short dance. Now you can disconnect and let Otto run freely calibrated.
- 15. CONGRATULATIONS! You have successfully calibrated Otto's servos. The positions have been saved to Otto and will not need to be calibrated again unless you change the Nano or any of the servos.
- 16. Did you have problems? ask in our community 🤔 join now!