3G 7.2Mbps HSPA Modem User Guide
•
0 likes•34 views

Essay Writing Service http://StudyHub.vip/3G-7.2Mbps-HSPA-Modem-User-Guide 👈

Recommended
More Related Content
Similar to 3G 7.2Mbps HSPA Modem User Guide
Similar to 3G 7.2Mbps HSPA Modem User Guide (20)
More from Dawn Cook
More from Dawn Cook (20)
Recently uploaded
Recently uploaded (20)
3G 7.2Mbps HSPA Modem User Guide
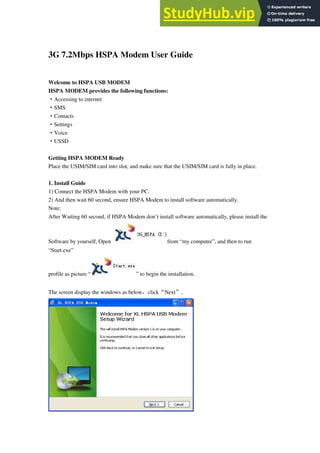
- 1. 3G 7.2Mbps HSPA Modem User Guide Welcome to HSPA USB MODEM HSPA MODEM provides the following functions: ·Accessing to internet ·SMS ·Contacts ·Settings ·Voice ·USSD Getting HSPA MODEM Ready Place the USIM/SIM card into slot, and make sure that the USIM/SIM card is fully in place. 1. Install Guide 1) Connect the HSPA Modem with your PC. 2) And then wait 60 second, ensure HSPA Modem to install software automatically. Note: After Waiting 60 second, if HSPA Modem don’t install software automatically, please install the Software by yourself, Open from “my computer”, and then to run “Start.exe” profile as picture “ ” to begin the installation. The screen display the windows as below,click“Next”,
- 2. Waiting for the computer to automatically install the data card driver, need wait for 2~5 minutes. After installation is complete, the “HSPA USB MODEM” will be added to the system program automatically. And you will see the short icon: 2. Connecting HSPA MODEM with a PC and Internet 1) After finished Installation, it will display as “P1” P1 2) Connecting with a user-defined logon profile Click on and select the <Connection settings> menu to open the profile setting window. “P2” to “P3”
- 3. P2 P3 3) If you can see the carrier’s profile in “p3”, click ok. Or add a new connection profile. Click on <Add> to open a new connection profile window: “P4”
- 4. P4 If <New profile> is selected, Click on <Next>, and the edit settings window will pop up; “P5” P5 After finished fill local network operator information in “New Profile” . such as “P6”
- 5. P6 Click on <Finish> to add it to the available profile list. “p7” P7 Setting a default connection profile a. Select one item from the list of available connection profile(s); Click on <New Profile> in “P7”
- 6. P8 b. Click on <Set default>(P8) to set it as the default profile; c. Click on <OK>,return main interface; d. Click on to start the connection using the specified profile. Connect to the Internet 1. Connecting with the default logon profile If you want to connect to the Internet without setting any user-defined or predefined profiles, press . The default connection profile will be used in accordance with your (U)SIM card. Connecting Click on from the main window; Wait several seconds until the connection is established; Once you are connected, will change into and the connection information window will appear in the tray bar.
- 7. 2. Disconnecting Click on from the main window to disconnect from the Internet. 3. Connection status information A connection status window will be displayed in the tray bar as soon as you are connected. Figure 1: Statistics Figure 2: Statistics It includes details such as the connection time and volume of data transferred. Click on <Statistics> for more details on the connection. Guide to other function The HSPA USB MODEM is designed to enable PC users access to the Internet via GPRS/EDGE/UMTS/HSPA networks. It uses a standard USB interface for a fast simple
- 8. connection to your PC. The modem’s firmware includes the following features: Wireless Internet connection SMS service Contact Manager Settings Voice USSD 1. Internet connection This application will ensure easy connection to the Internet. Users will be able to enjoy a high-speed data service by clicking on the button in the main window. Users can also access the connection status in the tray bar, including connection time and volume of data transferred. 2. SMS service With the SMS application, users can use the following functions: New SMS Edit SMS Group SMS Reply Forward Save number Call Export to PC Delete 3. Contacts Includes 2 memories: PC and (U)SIM card. It supports the following functions: New Edit Send SMS
- 9. Import and export vCard file Export text file Copy to PC and (U)SIM card Delete Search Call 4. Settings This contains the following settings: Network mode Network selection PIN enable/disable Modify PIN Connection profile settings Diagnostics SMS settings System settings Help About 5. Voice With the Voice application, users can use the following functions: Call/Answer Ring off Call history Set volume 6. USSD With this interface, users can use the USSD service if your carrier’s network support it.
- 10. Main interface introduction 1. Icon Functions / : Connect / disconnect to Internet : Access the SMS service window : Access the contact management window : Set parameters of the software : Access the voice service window :Access the USSD service window 2. Status bar information Current network operator name will be displayed on the status bar. If no device is found, “No device” is displayed If no SIM card is found, “No (U)SIM card” is displayed If the SIM card is invalid, “Invalid (U)SIM card” is displayed During Initialization, “Initializing” is displayed If searching for the network, “Searching” is displayed If no network is found,” No service” is displayed 3. Signal status bar : Indicates the signal strength of the current connected network Network type:
- 11. is displayed when GSM/GPRS is connected is displayed when UMTS is connected Support data service: is displayed if HSPA is available is displayed if EDGE is available Nothing is displayed if GPRS support is available : Indicates that there is an unread SMS in the main interface : Indicates that the (U)SIM card’s memory is full 4. Tray Icon If you click on , the main window is closed and the tray icon will appear in the tray bar. The main window can be reopened by double clicking on the tray icon. 5. System tray menu Open: Opens the main window Connect/Disconnect: Connects/disconnects to the Internet Statistics: Displays connection status information Contacts: Opens contact management window SMS: Opens SMS service window About: Application version Exit: Exits the application Entrance to main interface The application runs automatically and the main window will pop up when a device is connected. Users can also access and run the application from the <Start> menu. If the PIN code is enabled, please enter the correct PIN code in the entry field, and click on <OK>. Users may try only 3 times to enter the correct PIN code; after three incorrect attempts, the (U)SIM card will be blocked. A PUK dialog box will then be displayed asking the user to enter the right PUK code. Click on <OK>, and a default PIN code will be retrieved. If you fail to input the correct PUK code after 10
- 12. attempts, you will need to contact your service provider. If the PIN code is correct, the application will be launched and all features are enabled. Figure1: Main window
- 13. SMS Service Click on in the main window to access the SMS service interface. You can select <Contacts> at the bottom of the screen to switch to the contacts management window. 1. Displaying the received SMS When a new message is received, a message box appears in the tray bar. Click on <View> in the box to access the inbox or click on ; Left-click to show the content of the chosen message. You may also display the content by double-clicking on the message. Note: Received SMS will be saved on the (U)SIM card if the main window is closed, otherwise saved on the PC. 2. New SMS Click on <New SMS> in the shortcut menu bar. An SMS creation window will pop up; Enter the text. 3. Send (1) You may enter a recipient’s number in 3 ways: Enter the number directly. If there are two or more recipients, use “,” to separate each; Enter the name of a recipient saved in the phonebook; Click on <To> to access the recipients selection window. Select one party, or more (using the ctrl/shift key), and then click on <OK> to add the chosen party(ies) to the recipient list. (2) Click on <Send> to send the message. If the message is not sent, it will be saved in the Outbox. 4. Reply Select a message in the inbox and then click on <Reply> in the shortcut menu bar; The recipient’s number will appear in the <To> field. It can now be modified;
- 14. Enter the reply in input field, and then click on <Send>. 5. Forward Select a message and then click on <Forward> in the shortcut menu bar; The content of the selected message will appear in the input field. It can now be modified; Enter the recipient’s number and then click on <Send>. 6. Edit Access the draft list to select a message, and open it by double-clicking on it; Click on <Save> or <Send> when you have finished editing. 7. Delete Select a message, or several messages (using the ctrl/shift key); Click on <Delete> in the tool bar. A dialog box will ask “Are you sure to delete?” “Are you sure you would like to delete?” Click on <OK> and the SMS will be deleted. Once deleted, SMS messages cannot be restored. 8. Resend Access the outbox to select a message or several messages (using the ctrl/shift key); Click on <Send> in the tool bar; The application will resend the unsent message(s). 9. Export Select a message or several messages (using the ctrl/shift key) in the current list; Click on the <File> menu and on <Export>. A window will prompt for the location on your PC where the file should be stored; Click on <OK> to confirm. The SMS will be exported to the chosen location and saved as a *.txt file.
- 15. Contacts Press from the main window to access the contacts management interface. The contacts list column contains: All / PC / (U)SIM. Users can use contacts stored either on the PC or on the (U)SIM card in the corresponding window. 1. New Select <New> from the tool bar to access the contacts editor; Enter the relevant information, and press <OK>; the new contact will appear in the current contact list. 2. Edit Select a contact and access the contact editor by selecting <Edit> from the tool bar or by double-clicking on the contact; Modify the relevant contact information, and select <Save> to save the changes. 3. Delete Select one contact, or more (using the ctrl/shift key); Click on <Delete> from the tool bar. A dialog box will ask “Are you sure to delete?”; “Are you sure you would like to delete?” Click on <OK> and the contact(s) will be deleted; deleted contacts will not be restored. 4. Send SMS Select one contact or more (using ctrl/shift key); Click on <Send SMS> in the tool bar; When the message is completed, you may send it by clicking on <Send>.
- 16. 5. Copy to (U) SIM card/PC Select one contact, or more (using ctrl/shift key) stored in the same memory; Click on <Copy to> in the tool bar and select a target memory different from the memory being used; Contact(s) will be copied to the target memory. 6. Search Enter the key words or numbers in the empty field in the tool bar; The system will find entries which match the key word(s); 7. Export Select one or more contacts by pressing the ctrl/shift key from the current list; Click on <File> menu and select <Export>; select the export text or a vCard file. A window will pop up requesting the location on the PC where the contacts should be stored. Click on <OK> to confirm, and the contact(s) will be exported to the chosen location and saved as a *.txt or *.vcf file. 8. Import Click on the <File> menu and select <Import>. A window will pop up requesting the vCard file to be imported. Click on <OK> to confirm and the contact(s) will be imported to the current window.
- 17. Settings Click on from the main window. A menu with various settings will appear. 1. Network mode Select <Network mode> in menu. (The default according to the (U)SIM network type in connecting establishment.) Click <Auto> / <Only UMTS/HSPA> / <Only GPRS/EDGE>, it will search and register the network mode which was chosen at next time of device connection. 2. Network selection Select <Network selection> in the menu. The default setting is <Automatically>; Click on <Manually> to activate the network list window; A list of networks appears when the search is complete; Select an available network from the list of available operators and click on <Select>. It will register the selected network. 3. Request PIN Click on the <Request PIN> menu and select <Enable/Disable>. Activate the PIN input dialog box; Enter the correct PIN code; Click on <OK>. You will see the following message “PIN code has been enabled (disabled)”. 4. Modify PIN Click on <Modify PIN>, and activate the PIN modify dialog box;
- 18. Input the old PIN and the new PIN, then confirm; Click on <OK> to confirm the new PIN code Note: You can only access the modify menu if the PIN is enabled. 5. Connection profile settings Select <Connection settings> in the menu to access the connection profile setting window. All available connection profiles are listed. Adding a new connection profile Click on <Add> to open a new connection profile window: 1. If <New profile> is selected Click on <Next>, and the edit settings window will pop up; Enter any profile such as APN; Click on <Finish> to add it to the available profile list. 2. If <Choose from predefined list> is selected Click on <Next>, and a predefined list will appear on the pop up window; Select one item in the predefined profile list; Click on <Finish> to add it to the available profile list. Note: Users may obtain APN information from their operator. Edit Select an item in the connection profile list; Click on <Edit> to access the profile edit window; Modify the parameters and click on <Finish> to save the modification. Delete Select an item in the connection profile list; Click on <Delete> on the keyboard. You will be asked if you are sure you want to delete; Choose <Yes> to delete the profile from the list. Set a default connection profile Select one item from the list of available connection profile(s); Click on <Set default> to specify set it as the default profile; Click on to start the connection using a specified profile.
- 19. 6. SMS settings Choose <SMS settings> in the menu to access the SMS settings window. SMS center number The default number is found in the (U)SIM card. You may change it. SMS validity period You can choose between: 1 hour/6 hours/1 day/1 week/maximum. SMS validity period Click to √ validate the message alert sound. You can choose *.wav file saved in the PC using the <Browse> option. 7. System settings Click to √ validate the sound prompt when the Internet will be connected/ disconnected. 8. About & help You can get information on the version in the <About> menu. If you need help, click on <Help> to access the help document. Voice Click on in the main window to access the voice service interface. 1. Call/Answer Input the telephone number and click on to make a call. If there is a coming call, press this
- 20. button to answer it. 2. Ring off Click on button to end or reject a voice call. 3. Call history Press to acess the call history. 4.Set Volume Drag the volume bar to change the volume. USSD Click on in the main window to access the USSD service interface. FAQ 1. Q: Which operation systems does the software support? A: It supports Windows 2000, Windows XP, and Windows Vista. 2. Q: The software does not auto-run when the device is plugged in. Situation1: if there is no notification from the PC, please check if the auto-run has been disabled by Windows. Situation2: If the device remains on the U-disk, please check if an anti-virus application has disabled the auto-run. A: Please launch the software manually if you do not change the configuration of your PC.
- 21. 3. Q: I cannot install the driver A: On some PCs, installation of the driver may take a long time because of the PC configuration. So please wait and do not cancel the process or you will have to uninstall and re-install again. 4. Q: What should I do if the main window continues to display “Searching device”? A: Please remove the device and reinsert it. 5. Q: What should I do if the (U)SIM card is unplugged during the application? A: Please disconnect the device first, and then restart the application. 6. Q: The (U)SIM card does not register any networks A: The reasons are shown below: 1. Unstable local signal; 2. The software is an old version; 3.Hardware problem. You may: 1. Try to logon from another location; 2. Update the software; 3. Check the hardware or use another data card and retry. 7. Q: Why does the prompt “Unavailable connection profile” appear? A: Please add a connection profile manually. 8. Q: It failed to connect to the internet A: Please make sure the connection profile and settings are correct. 9. Q: Sending an SMS failed A: Please make sure the SMS center number is correct. 10. Q: I can not receive an SMS A: Please check whether your (U)SIM card’s memory is full. 11. Q: Why can I only save part of the name when adding a new contact? A: The (U)SIM card can only hold 12 SBC characters, and 6 DBC characters.