Paloma instruction manual
•
4 likes•6,597 views

PA-209J, PA-6PEJ, PA-7PEJ, PA-7PSJ, PA-6MEJ, PA-7MEJ, PA-5MEJ

Recommended
More Related Content
Similar to Paloma instruction manual
Similar to Paloma instruction manual (20)
Recently uploaded
Recently uploaded (20)
Paloma instruction manual
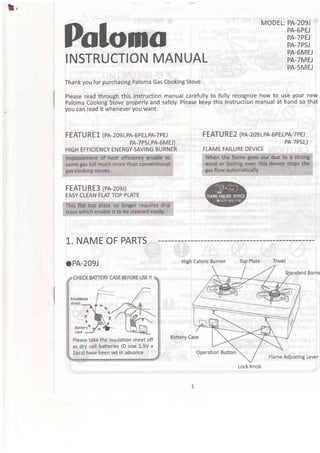
- 1. |. Psloncr MODEL: PA-209J PA-5PEJ PA-7PEJ PA-7PSJ PA-6MEJ PA-7MEJ PA-sMEJ INSTRUCTION MANUAL Thank you for purchasing Paloma Gas Cooking Stove Please read through this instruction manual carefully to fully recognize how to use your new Paloma Cooking Stove properly and safely. Please keep this Instruction manual at hand so that you can read it whenever you want. F EATU R E 1 (pn-zosJ,pA-6P E J,PA-7 PEJ PA-7PSJ,PA-6MEJ) HIGH EFFICIENCY ENERGY.SAVING BURNER FEATURE3 (pn-zog.r) EASY CLEAN FLATTOP PLATE F EATU R E 2 (pn-zosJ, pA-6pEJ,pA-7pEJ PA-7PSJ,) 1. NAME OF PARTS o PA-209J High Caloric Burner Top Plate Trivet Battery Case Operation Button S Flame Adjusting Lever FLAME FAILURE DEVICE CHECK BATTERY CASE BEFORE USE !! I nsulation Please take the insulation sheet off as dry cell batteries (D size 1.5V x 2pcs) have been set in advance. Lock Knob
- 2. f. O PA-5P EJ, PA-7 PEJ, PA-7 PSJ O PA-SMEJ Drip Tray Left Burner Right Burner O PA-6MEJ,PA-7MEJ Top Plate Flame Adjusting Lever +Battery Case of PA-7PEJ, PA.TPSJ 2. CAUTION TO USE THIS APPLIANCE SAFELY AND PROPERLY To use this appliance safely without any injury or property damage, this manual shows some symbols as below Please read carefully to fully recognize the symbols. lf the information is not followed exactly, a fire or serious personal damage or death mav result. lf the information is not followed exactly, it is possible that a fire or serious personal damage or death mav result. a cAUloN lf the information is not followed exactly, it is possible that personal injury or property damage mav result. Easy symbol mean J Generally Prohibited o@ACaution should be should be followed well-ventilated Trivet Operation Button A onrucER DO NOT USE THE APPLIANCE IN THE CASE OF GAS LEAKAGE When noticing gas leakage, do not light or turn on and off the switch of electric appliances like ventilation fan. Do not plug or unplug the appliances and do not use telephone. Flame or spark may ignite the gas and cause a fire. q.@ lf a gas leakage is noticed: 1. Cease operation immediately and close the Gas Val 2. Open windows or doors to disperse gas. 3. Contact a service person.
- 3. f. AwnnNrNG ENSURE THAT THE TYPE OF GAS MATCHES WITH THE GAS SHOWN RATING PLATE lf it differs, do not use the appliance. The use of unmatched gas may cause a carbon monoxide poisoning due to the imperfect combustion, scalds due to the explosive ignition or malfunction of the appliance. lf you are uncertain about a gas type, please contact the sales outlet or Paloma distributor. DO NOT DISASSEMBLE Only an authorized person should disassemble, repair or modify the appliance. >> Those works by unauthorized person may result in malfunction of the appliance or personal iniurv. otb-r z-t---u r-------------- ." ,G- l.o o.l <_, (K).J7 DO NOT LEAVE OR SLEEP WITH THE APPLIANCE OPERATED Food may be burned and cause a fire during cooking. o Pay extra attention when frying. ENSURE THE BURNER IS EXTINGUISHED After cooking, make sure to extinguish and shut the gas intake valve. YOU USE ON THE DO NOT PLACE FLAMMABLE MATERIALS AROUND THE APPLIANCE Seasoning dispenser rack, curtain, newspaper, paper bag, plastic bottle, cooking oil and similar articles may cause a fire. Aerosols can has the risk of explosion by heat due to the increased oressure inside. Do not place a newspaper, plastic sheet, or power code under the appliance DO NOT USE FLAMMABLE FUELS LIKE GASOLINE OR BENZINE NEAR THE APPLIANCE They may catch fire and cause a fire. IN CASE OF MALFUNCTION t. Cease operation immediately and close the gas valve when gas is not ignited or stopped and abnormal combustion, odotl noise are noticed or in emergency cases like earthquake or fire. 2. Check and remedy in accordance with the trouble shooting guide. 3. Cease the operation and contact person if the malfunction cannot a servtce be solved CHECK AND REPLACE THE RUBBER HOSE @Close the gas valve DO NOT USE AN OVERSIZED ROASTING PAN OR GRILL THAT COVER THE COOKER It may cause imperfect combustion, abnormal overheating, or damage of top plate.
- 4. f. CONNECTION OF RUBBER HOSE 1. Do not give an extension or two ways connection to the hose. 2. Do not pass the hose under or above the appliance. 3. Keep the hose away from high temperature part like a heat source. 4.There must be no fold, no distortion and no pull. 5. Clean the connection part to be free. DO NOT CARRY THE APPLIANCE WHEN IN USE OR RIGHT AFTER USE It may cause a fire or a burn. There is a risk that pans on the appliance may slip out during the cooking and cause a burn or STORE _BOUGHT ACCESSORIES Do not use store-bought accessories like a drip tray made of aluminum foil or a grill. It may cause the carbon monoxide poisoning or abnormal combustion. Distortion or discoloration of the top plate or the trivet can be cause also. -)cgy USE GENUINE PARTS OF PALOMA Do not use other accessories than those packed in the original carton or genuine spare parts of Paloma. In case other accessories are used for the Paloma product, Paloma is out of any responsibility for the malfunction or accident caused by the Product' A cnuloN PREVENTION OF GAS ACCIDENT Do not use the appliance in the closed room for a long time. Open the window or turn on a ventilation fan during use. It may cause a carbon monoxide poisoning. lf you keep other operated gas appliance like space heater for a long time in the same room, it may become difficult to ignite or cause abnormal combustion. When natural draft type gas water heater is used at the same time, open the window instead of using the fan for ventilation. There is the risk that exhausted gas going through flue pipe may come into the room by turning on the ventilation fan' DO NOT IGNITE WITHOUT USING IGNITION SYSTEM OF THIS APPLIANCE DO NOT USE THE APPLIANCE FOR atm PURPOSE lt may cause a burnout o,. . U -tr fire due to the overheating or abnormal combustion. DO NOT USE THE APPLIANCE WITHOUTTRIVET sDo not place the Pan on the burner directly. lt may cause the imPerfect combustion or a burnout of the appliance.
- 5. l. DO NOT TOUCH THE APPLIANCE OTHER THAN OPERATIONAL PARTS DURING USE AND RIGHT AFTER THAT Body and around the appliance or utensils placed around it become very hot. Be careful of a burn. WIPE OFF WATER DROPS AFTER WASHING THE BURNER CAP water drops may J cause a failure of an 17 ignition. PLACE THE APPLIANCE ON THE HORIZENTAL PLACE lf the appliance is lean, the pans on the appliance may slip out during the cooking and cause a burn or an injury. lt may also cause an accident or malfunction of the appliance. DO NOT PUT FACE CLOSE TO BURNER WH OPERATION OR IN USE It may cause a burn. Clothes may catch fire. EN IN s DO NOT LET CHILDEREN OR INFANTS TOUCH THE APPLIANCE It may cause an unexpected accident. USE PANS WHICH CAN BE PUT ON THE TRIVET STABLY Grip the handle of the round-bottomed pan or pots with small bottom while cooking. The pan or pot may lean and cause a burn. ADJUST THE FIRE POWER TO PREVENT A FLAME REACHING TO THE HANDLES OF THE POT lt may cause a burn and ? . breakdown of handles. S IF FAILED TO IGNITE, TURN OFF THE IGNITION BUTTON AND REIGNITE AFTER CONFIRM THAT GAS HAS NOT REMAINED AROUND lf reignite right after failed in ignition, gas around the appliance may catch fire and cause a burn. PUT GROVES ON DURING CHECKING AND MAINTENANCE nce W{ Mcause EX &;il ection K ffi ATTENTION o As this appliance is for household use, the appliance life will be markedly decreased if it is used for commercial use. o Check the combustion occasionally during use. o Take the batteries out before scrapping the appliance. a lt may be difficult to ignite the appliance if the appliance is not used for a long time. It may be caused by air in hose. Please repeat the igniting operation. o Do not push the front side of the top plate strongly. Top plate may float.
- 6. T. 3. INSTALLATION I INSTALLATION OF PARTS * Take out the appliance from the carton and remove the packing materials and tape. * Check the type of gas shown on the rating plate. lf it differs, do not install the appliance and contact the sales outlet or Paloma distributor. BURNERCAP Burner caps from straight above TRIVET The cut should be set to "A" mark on burner ca which is opposite side of you. Place the thre projections from underside of the trivet on the ho of the top plate. CAUTION Set it horizontally without lean or floating. It may cause an imperfect combustion or fire -:----- ot -E: ,l ---!+tJ ' High Caloric burner Sta-ndard burner burner cap de of you notch on V * Place the high caloric burner head which has "H" mark on the surface on the high caloric burner. CAUTION Set it horizontally without lean or floating. It may cause an imperfect combustion or fire Floating Wrong side (reversed) Pelase take the insulation sheet off as dry cell batteries (D size 1.5V x 2pcs) have been set in advance. WARN ING Standard burner should be installed on wall side. O Prevent fire on the wall.
- 7. l. T INSTALLAT.ION OF PARTS * Take out the appliance from the carton and remove the packing materials and tape. * Check if the type of gas shown on the rating plate. lf it differs, do not install the appliance and contact the sales outlet or Paloma distributor. BURNERCAP Ihe "*2" or "4" mark on the burner cap should be set opposite side of you or "7-< :r" mark on the burner cap should be set your side to fit its projection to the notch on the burner body. * Place the high caloric burner head which has "H" mark on the surface on the high caloric burner. CAUTION Set it horizontally without lean or floating. It may cause an imperfect combustion or fire @s TRIVET The cut should be set to opposite side of you. Place the drip tray with bigger opening on the high caloric burner and the drip tray with the smaller opening on the standard burner. CAUTION Do not place the drip tray having small opening on the high caloric burner. It may cause imPerfect combustion, fire, or malfunction of the appliance. Above illustration shown is for PA-5PEJ,7PEJ,7PSJ and 6MEJ. Please refer to this even the illustration of PA-7MEJ and PA-5MEJ is not shown here as the way of installation are same. W@ Rg Awnnurue Standard burner should be installed on wall side. o Prevent fire on the wall. IPA-5PEJl 1-. Pull out the battery case to your side by lifting up the lock. 2. Set the battery into the case with its + pole to your side(front). 3. Insert the battery case into the body firmly until you hear a click. IPA-7PEJ, PA-7PSJl L. Open the battery case lid 2. Insert the - side of the battery first to the right side. 3. Close the battery case lid.
- 8. |. INSTALLATION SITE lnstall the appliance properly to prevent monoxide poisoning, fire or burn. carbon A wnnrutrue Please choose the place that satisfies the fol lowi ng requirements. O No blowing wind O Free from sPlashing water O Good ventilation O No resin products like lighting appliance above O Horizontal and stable board O Nothing fall down O No water heater above O No flammable materials nearbY ln case fla appliance. ( are arouno ke wooden the wall, thin Keep the flammable materials more than 15cm away from the both sides of the top plate and more than lOOcm away from the top face of the top plate. flammable wa inless plate or tile is put, shell Connection of Rubber Hose Necessary fitting: O9'5mm rubber hose for gas (new one)- 1 Piece Clamper for rubber hose - 2 Pieces Cut the rubber hose as short enough as it does not touch the aPPliance bodY. The rubber hose should be connected with the gas connection on both sides up to the red line and be clamPed. Open the gas intake valve and make sure that there is no gas odor around the connection part. Shut the gas intake valve' More tlran lScm More than I OOcm More than lScm * sAr>t< Jtt"s o r'
- 9. l. 4. HOW TO USE 1. PREPARATION 1) Wipe away water drops on the pan before placing the pan on the trivet to avoid the failure in ignition due to the drops of the water into the appliance' 2) [PA-2O9J,PA-5PEJ, PA-7PEJ,PA-7PSJ] Make sure the ignition buttons are not pressed position. Open the gas intake valve fully. IPA-6M EJ, PA-7M EJ, PA-5 M EJ] Make sure the ignition knobs are at"OFF" (extinction) position' 3) [PA-209J] Slide the Lock knob to the left position to unlock' (All other models do not have lock knob.) 2. IGNITION 1) [PA-209J,PA-6PEJ,PA-7PEJ,PA-7PSJ] Press the ignition button gently and fully. Keep it at depressed position until the burner gets flame perfectly. O lf the operational button is not depressed fully, the burner will not be ignited. O The burner is ignited with continuous sparking' O lf you press the button when the flame adjusting lever is positioned at "weak" side, 3. FLAME CONTROL 1) [PA-2O9J,pA-6pEJ,pA-7pEJ,PA-7PSJ] Slide the flame adjusting lever gently taking a look at the flame. O while using, check the ignition and combustion occasionally' O Even if you slide the lever from "strong" to "weak" quickly, the flame will be getting smal IPA-6MEJ,PA-7MEJ,PA-5MEJI Tu gently taking a look at the flam o when the knob is positione ful not to put out the flame. O While using, check the ignit occasionally' 4. EXTINCTION 1) [pA-2ogJ,pA-6pEJ,pA-7PEJ,PA-7PSJ] Press the ignition button again to put out the flame. IpA-GMEJ,pA-7MEJ,pA-5MEJ] Turn back the ignition knob to "OFF" (extinction) position. O Confirm the extinction. [pA-209J] Slide the Lock knob to the right position to lock. (All other models do not have lock knob.) Shut the gas intake valve. O Do not shut the gas intake valve when in combustion. the lever automatically gets toward "strong" [PA-6MEJ,PA-7MEJ,PA-5MEJ] Push and turn th to "ON" (ignition) position and keep it for a 2l Make sure that the flame stays on after releas 2) 3)
- 10. l. 5. CHECK AND MAINTENANCE A cnuroru DO NOT SOAK THE APPLIANCE IN WATER OR SOURSE WATER OVER APPLIANCE, >> lt may cause imperfect combustion or breakdown. ATTENTION Do not check and maintenance before close the gas valve and the appliance is cooled off. (lt takes time to cool off) Be sure to check and do maintenance usually. Do not use disordered appliance. Please refer to the "Trouble shooting guide" first and if the trouble cannot be solved by taking the remedy in accordance with "Trouble shooting guide", please contact service person. Do not repair by yourself. Do not put flammable materials or obstacles around the appliance. Please confirm that the accessories (burner cap, drip tray, trivet, etc.) are set properly. Please check the connection of rubber hose. lf the rubber hose is worn-out, cracked or loose, change it to new one, Please replace the dry cell battery when the burner is difficult to be ignited. lf the appliance has got dirty due to boiling over, etc., please clean it. Please check if there is no gas odor from the connection of rubber hose. ATTENTION Do not use thinner, benzin, acid detergent, alkaline detergent etc. They may cause damage of appliance. Do not use hard material like cleanser, scourer to clean printing surfaces and paintworks. Clean the stain each time. The stain willget stubborn if the stain will be left as it is. Be careful not to drop the appliance or removed parts down, it may cause a injury or malfunction of the appliance. Do not spray the cleanser onto the appliance directly. malfunction or corrosion as the cleanser goes into the Make sure that accessories are set properly after finis sh jngbenzin --prdlishine wire p-owdef, wool 10
- 11. f. I Trivet, Drip traY After washing trivet or drip tray with neutral detergent for kitchen, wipe it off with a dry cloth. I Se nsor a nd e I ectrod e [PA-209J, PA-6PEJ, PA-7 PEJ, PA-7 PSJ] When they are clogged or wet, wipe them with a soft cloth' Stain or water drop make it hard to ignite. Do not change the position or damage the parts of the appliance' It may cause malfunction of the appliance. I Burner Cap lf the burner makes uneven flame, clean the ditch and orifice of the burner cap with a wire brush, nail or something thin. Clog of burner cap may cause defective ignition or imperfect combustion' Wash the black part of the surface with a soft sponge and use neutral detergent for kitchen. The burner cap is usable even if black surface comes off. I Top Plate Wipe it with a dry and soft cloth to clean it. lf the stain does not come off easily, wash it with the neutral detergent kitchen and wipe it with a dry cloth. Flame Rod for IPA-209J, PA-6PEJ, PA-7 PEJ, PA-7 PSJ] please replace the exhausted battery with new one when the burner fails to be ignited after long-term use. Dry Cell Battery (size D 1.5V x 2) [PA-209J, PA-6PEJ] L. Pull out the Battery Case to your side by lifting up the lock. 2. Set the battery into the case with its + pole to your side (front). 3. Insert the Battery Case into the body firmly until you hear a click. Dry Cell Battery (size D 1.5V x 1) [PA-7PEJ, PA-7PSJ] 'J.. Open the batterY case lid. 2. Insert the - side of the battery first to the right side. 3. Close the battery case lid. ATTENTION The appliance will not be activated if the +pole and -pole of the batteries are opposite' When ioreign substances like water come into the battery case, wipe them off to avoid the poor contacting of the battery. Battery life is about a year with normal use' 1.L
- 12. l. 6. TROUBLE SHOOTING GUIDE lf you suspect that the appliance is in trouble' check the following points' lfthestateoftroub|edoesnotcorrespond*itr'.fo||owingphenomenonorthetroub|eremainsevenafter your taking countermeasures, please contact the dealer where you purchased the appliance or a competent person for technical assistance' Open it fullY. Gas in take valve is not opened fully' The burner fails to be ignited. The flame goes out when in use. Replace the batterY. Dry cell batterY is exhausted' Dry cell battery is not set properly' The rubber hose is bent' The rubber hose is not connected properly' The burner caP is clogged' The burner cap is floating or leaning' The driP tray is not set ProPerlY' Repeat the ignition Procedure to expell all the air.Air in rubber hose. Clean the sensor or electrode' The sensor or electrode is clogged or wet' Extra drip tray made of aluminum is on the Replace it with new cYlinder' Gas cYlinder is almost empty' The burner caP is clogged' Yellow or unstable flame is observed The burner cap is floating or leaning' Set it proPerlY. The driP traY is not set ProPerlY' Connect it firmlY. The rubber hose is not connected properly' Replace it with new one. The rubber hose is broken or has crack' The burner cap is floating or leaning' Thesma||noisewhenignitionandextinctionorwhi|eusingarenotoutoforder. lf you notice ,ny ,,rrngz'noise Leyond the above' please contact your dealer' t2
- 13. t}. 7. PRESERVATION Preservation (When not using the appliance for a long time) ! Shut the gas valve and remove the rubber hose. Cover the gas inlet with vinyl, tape, etc. for keeping it free from dust, etc. Clean the appliance. Remove the battery from the case. Put the appliance into the carton box, vinyl bag, etc. and keep it free from dust or damp. L. 2. 3. 4. 5. 13
- 14. l-. 8. SPECIFICATIONS GAS COOKING STOVE CONTINUOUS SPARK H218xW590xD463 H2L3x W590 x D461 H188xW690xD405 6.2kg 5.0kg 5.5kg O 9.5mm RUBBER HOSE FOR GAS FLAME FAILURE DEVICE ENAMEL ENAMEL PA-7PEJ: ENAMEL PA-7PSJ: STAINLESS DRY CELL BATTERY D size 1.5V x 2 D size L.5V x 1 GAS COOKING STOVE H2I3x W590 x D473 H191x W690 x D416 H101x W558 x D354 O 9.5mm RUBBER HOSE FOR GAS GAS CONSUMPTION * Since we are constantly improving our products, all specifications are subject to change. 14
- 15. l. PsJomo HEAD OFFICE: 6-23, Momozono-cho, Mizuho-ku, ll l rilillllllllll lllllllll I lil 3890286000 1 Nagoya, JAPAN 26.12. H 38-90286-oo O